Help
Setting up Amazon SES with Newsletter Sender.
Set up your Amazon Simple Email Service (SES) from scratch. Follow these step by step instructions to take an empty AWS account to sending your first newsletter. The initial setup takes roughly 10 minutes, followed by a short wait while AWS reviews your production access.
1Before you start
Ensure you have an AWS account with administrative access, along with the email address you plan to send from (such as news@yourdomain.com). If you haven't set these up yet, check the prerequisites guide first.
Amazon SES operates on a region by region basis. Choose a single region closest to the majority of your audience, and stick with it throughout this guide. Newsletter Sender supports:
| Region code | Where it is |
|---|---|
eu-west-1 | Europe (Ireland) |
eu-west-2 | Europe (London) |
eu-central-1 | Europe (Frankfurt) |
us-east-1 | US East (N. Virginia) |
us-east-2 | US East (Ohio) |
us-west-2 | US West (Oregon) |
ca-central-1 | Canada (Central) |
ap-southeast-2 | Asia Pacific (Sydney) |
ap-south-1 | Asia Pacific (Mumbai) |
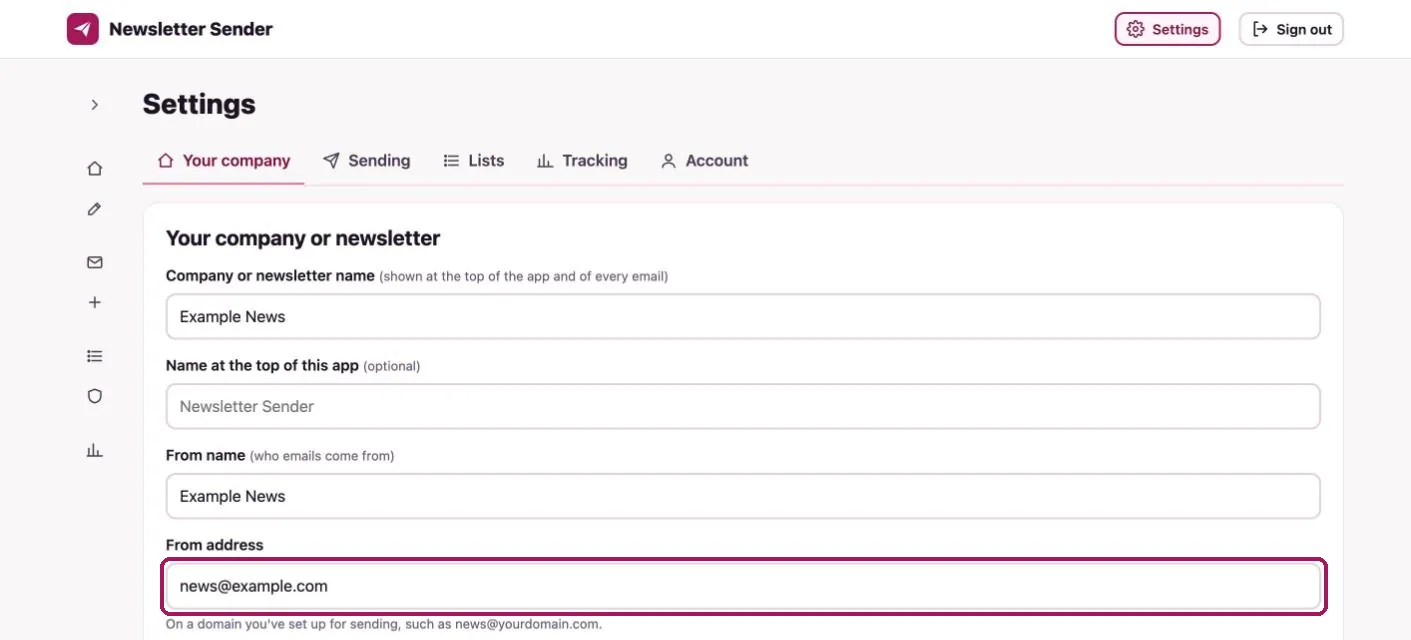
eu-west-1 for readers in the UK and Europe, or us-east-1 for North America.- In Newsletter Sender, go to Settings → Your company and check the From address. Amazon SES is set up for this address's domain, so set it first. Click Save if you changed it.
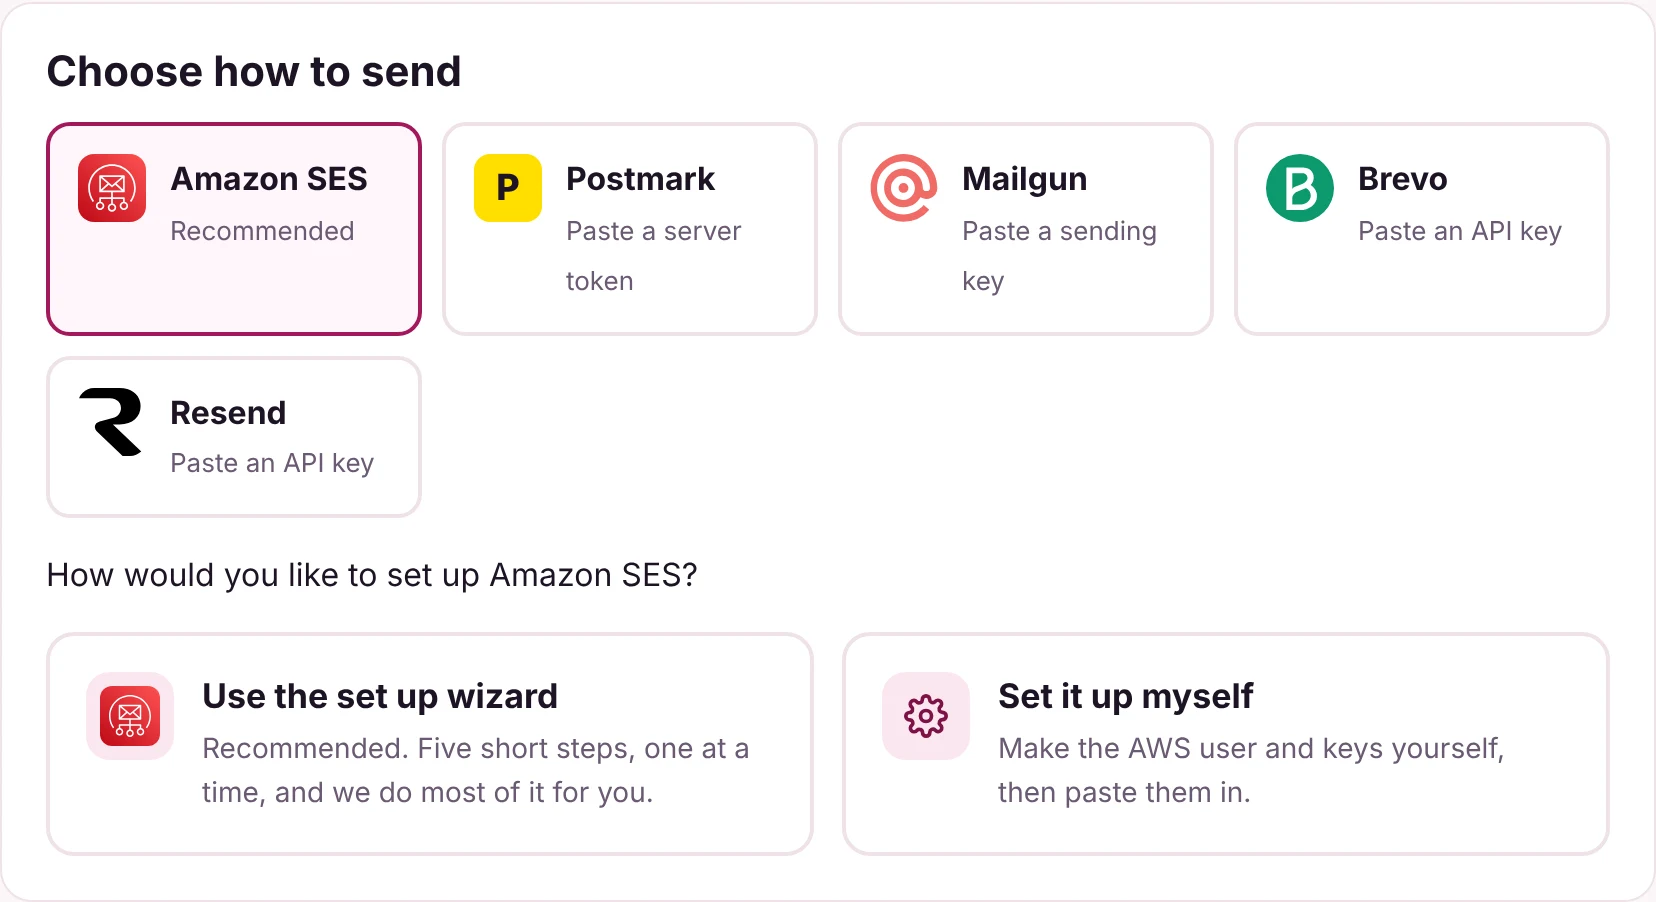
Choose how to set up Amazon SES
- Automatic setup wizard (recommended): create your AWS user and keys with one button (this also makes your S3 backup bucket), and Newsletter Sender verifies your sending domain, sets up bounce and complaint webhooks and adds the required DNS records directly to Cloudflare.
- Manual setup: configure AWS by hand if your AWS permissions restrict CloudFormation, or you prefer to create the user and keys yourself.
2Use the setup wizard
The wizard walks you through five quick, focused steps and handles the heavy lifting automatically. A progress bar at the top tracks your setup along the way.
- Go to Settings → Sending and select Amazon SES.
- Click Use the setup wizard to begin.
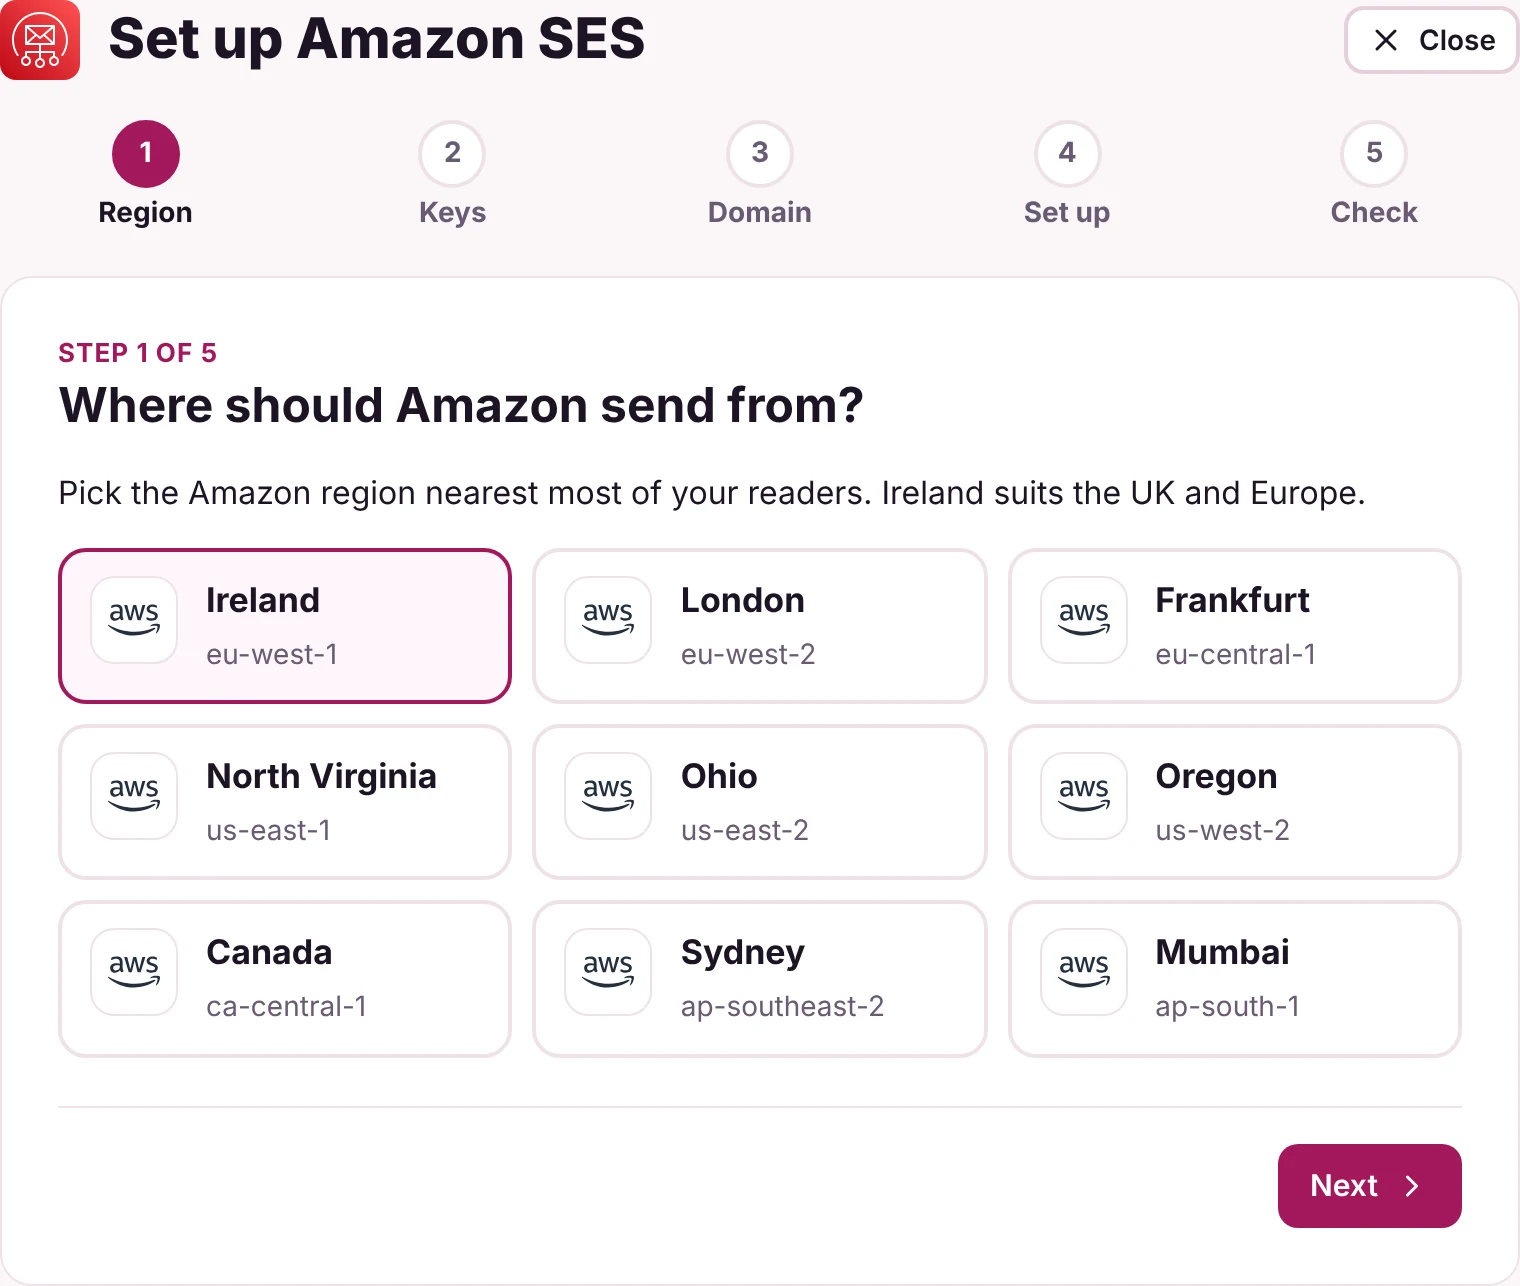
Step 1: Region
- Select the AWS region closest to where most of your readers live, then click Next. For readers in the UK and Europe, Europe (Ireland) is typically best. Refer to the regions table in Before you start if you're unsure.
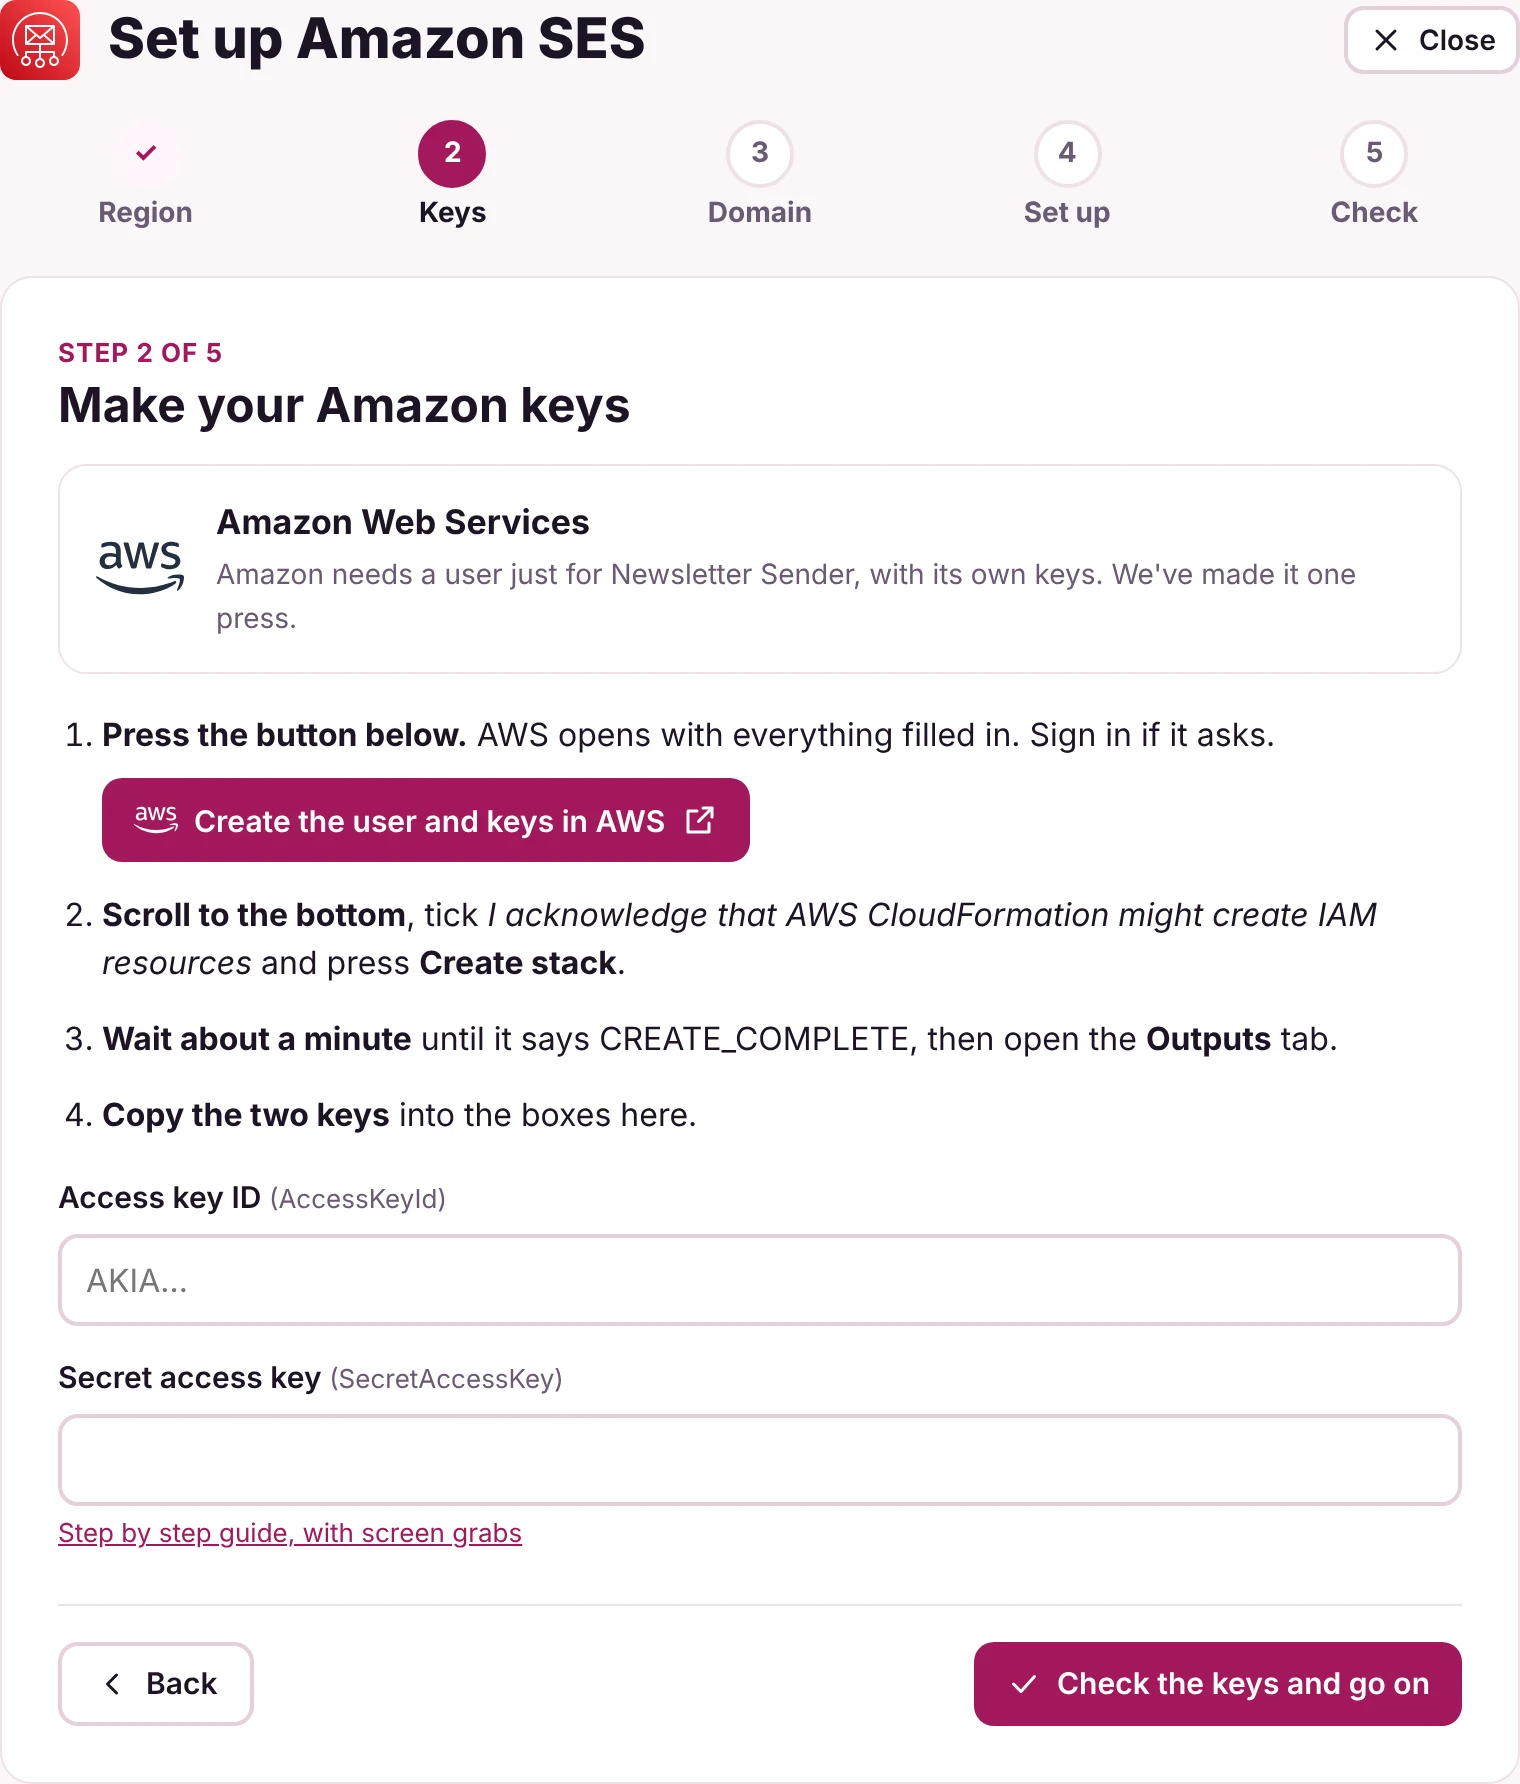
Step 2: Generate your AWS keys
- Click Create the user and keys in AWS. AWS will open in a new browser tab with the required parameters pre-filled. Sign in with an administrator account if prompted. This automatically creates a restricted IAM user with permissions limited to Amazon SES and SNS (plus adding backup copies to S3), complete with a dedicated access key.
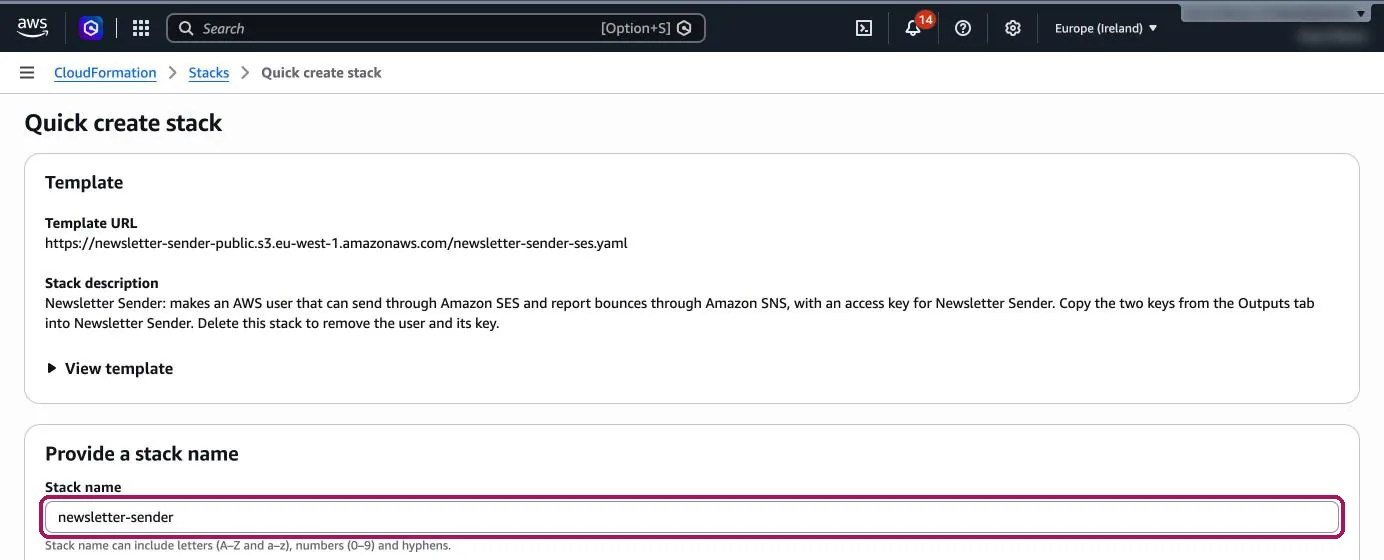
- AWS will show the Quick create stack screen with all parameters pre-populated. Confirm that the Stack name reads
newsletter-senderand that the AWS region in the top right corner matches the region you selected earlier. Leave all other parameters at their defaults.
- Scroll to the bottom and check the box that reads I acknowledge that AWS CloudFormation might create IAM resources. AWS requires this confirmation whenever a template creates users.
- Click Create stack.

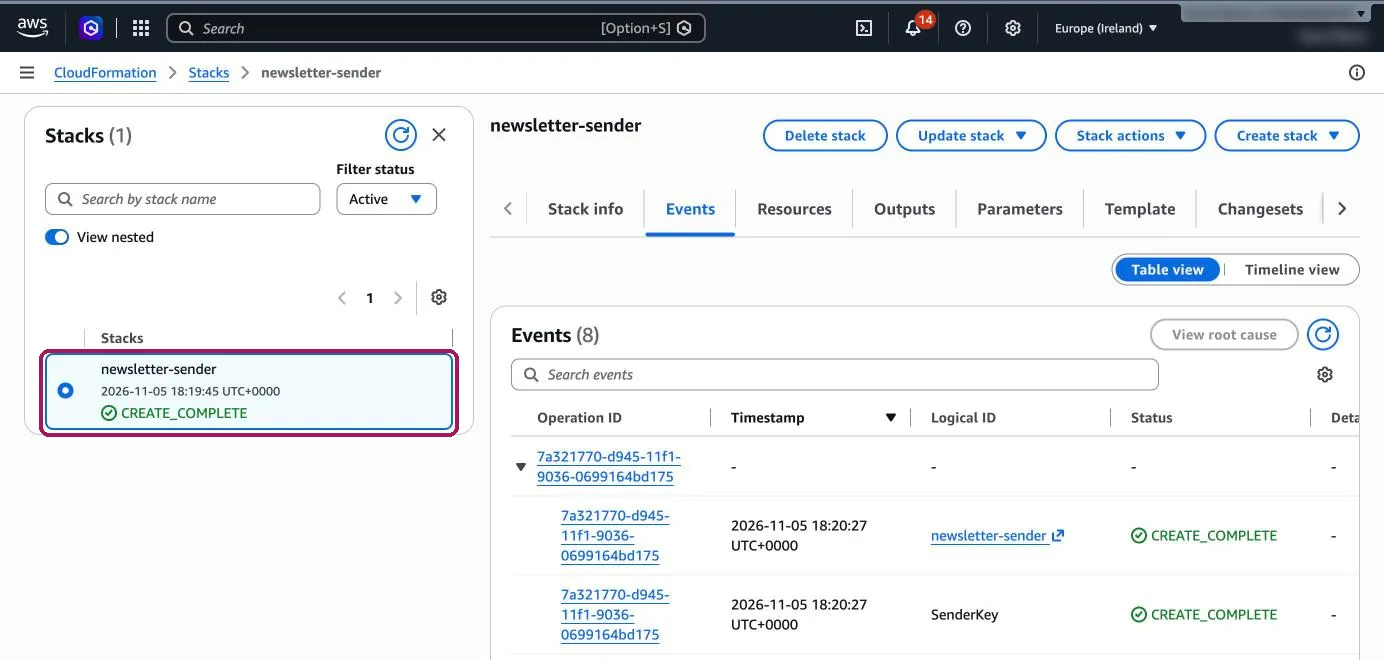
- Wait for the status to show CREATE_COMPLETE. This usually takes about a minute. If the status doesn't update on its own, click the circular refresh button.
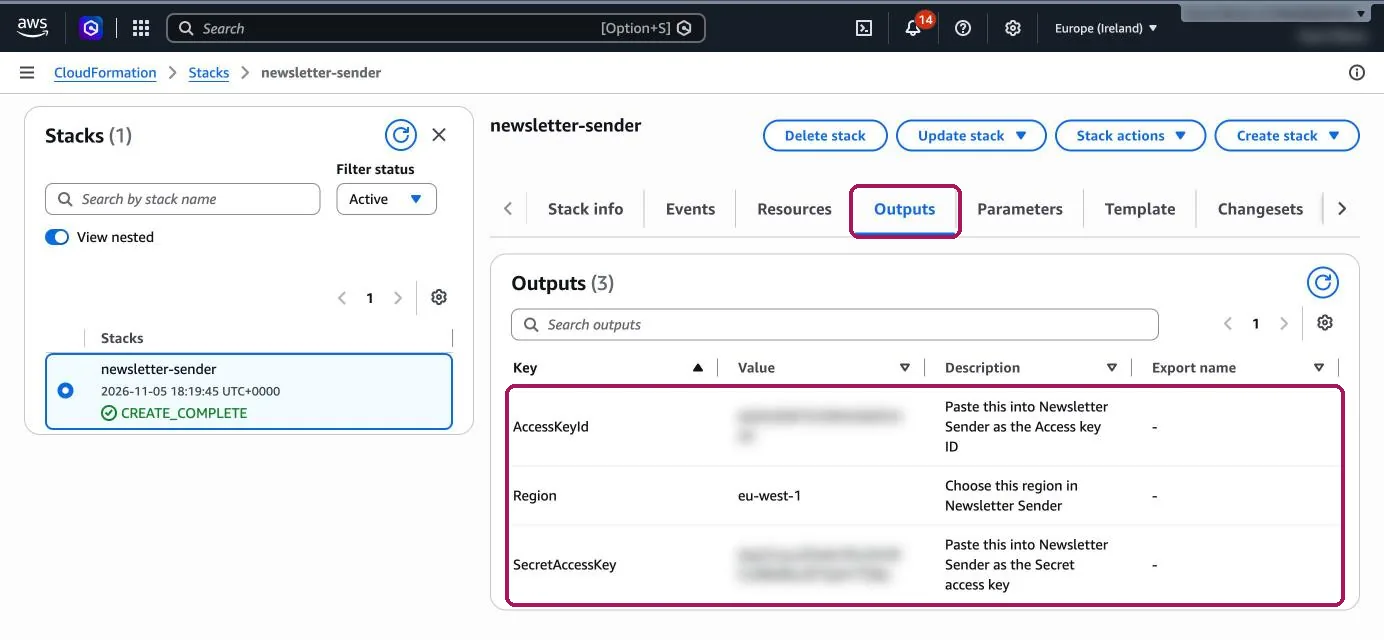
- Click the Outputs tab. You will see values for
AccessKeyId,SecretAccessKeyandRegion. Keep this tab open, as you will need to copy these across to Newsletter Sender in the next step.
- Switch back to the setup wizard in your Newsletter Sender tab. Copy and paste
AccessKeyIdinto Access key ID, andSecretAccessKeyinto Secret access key. Be sure to highlight the exact text so no accidental spaces are copied over. - Click Check the keys and continue. The wizard checks your keys directly with AWS before going on. Your keys are encrypted securely within your own Cloudflare account and are never displayed again.
Step 3: Domain
The wizard automatically detects where your domain's DNS is hosted.
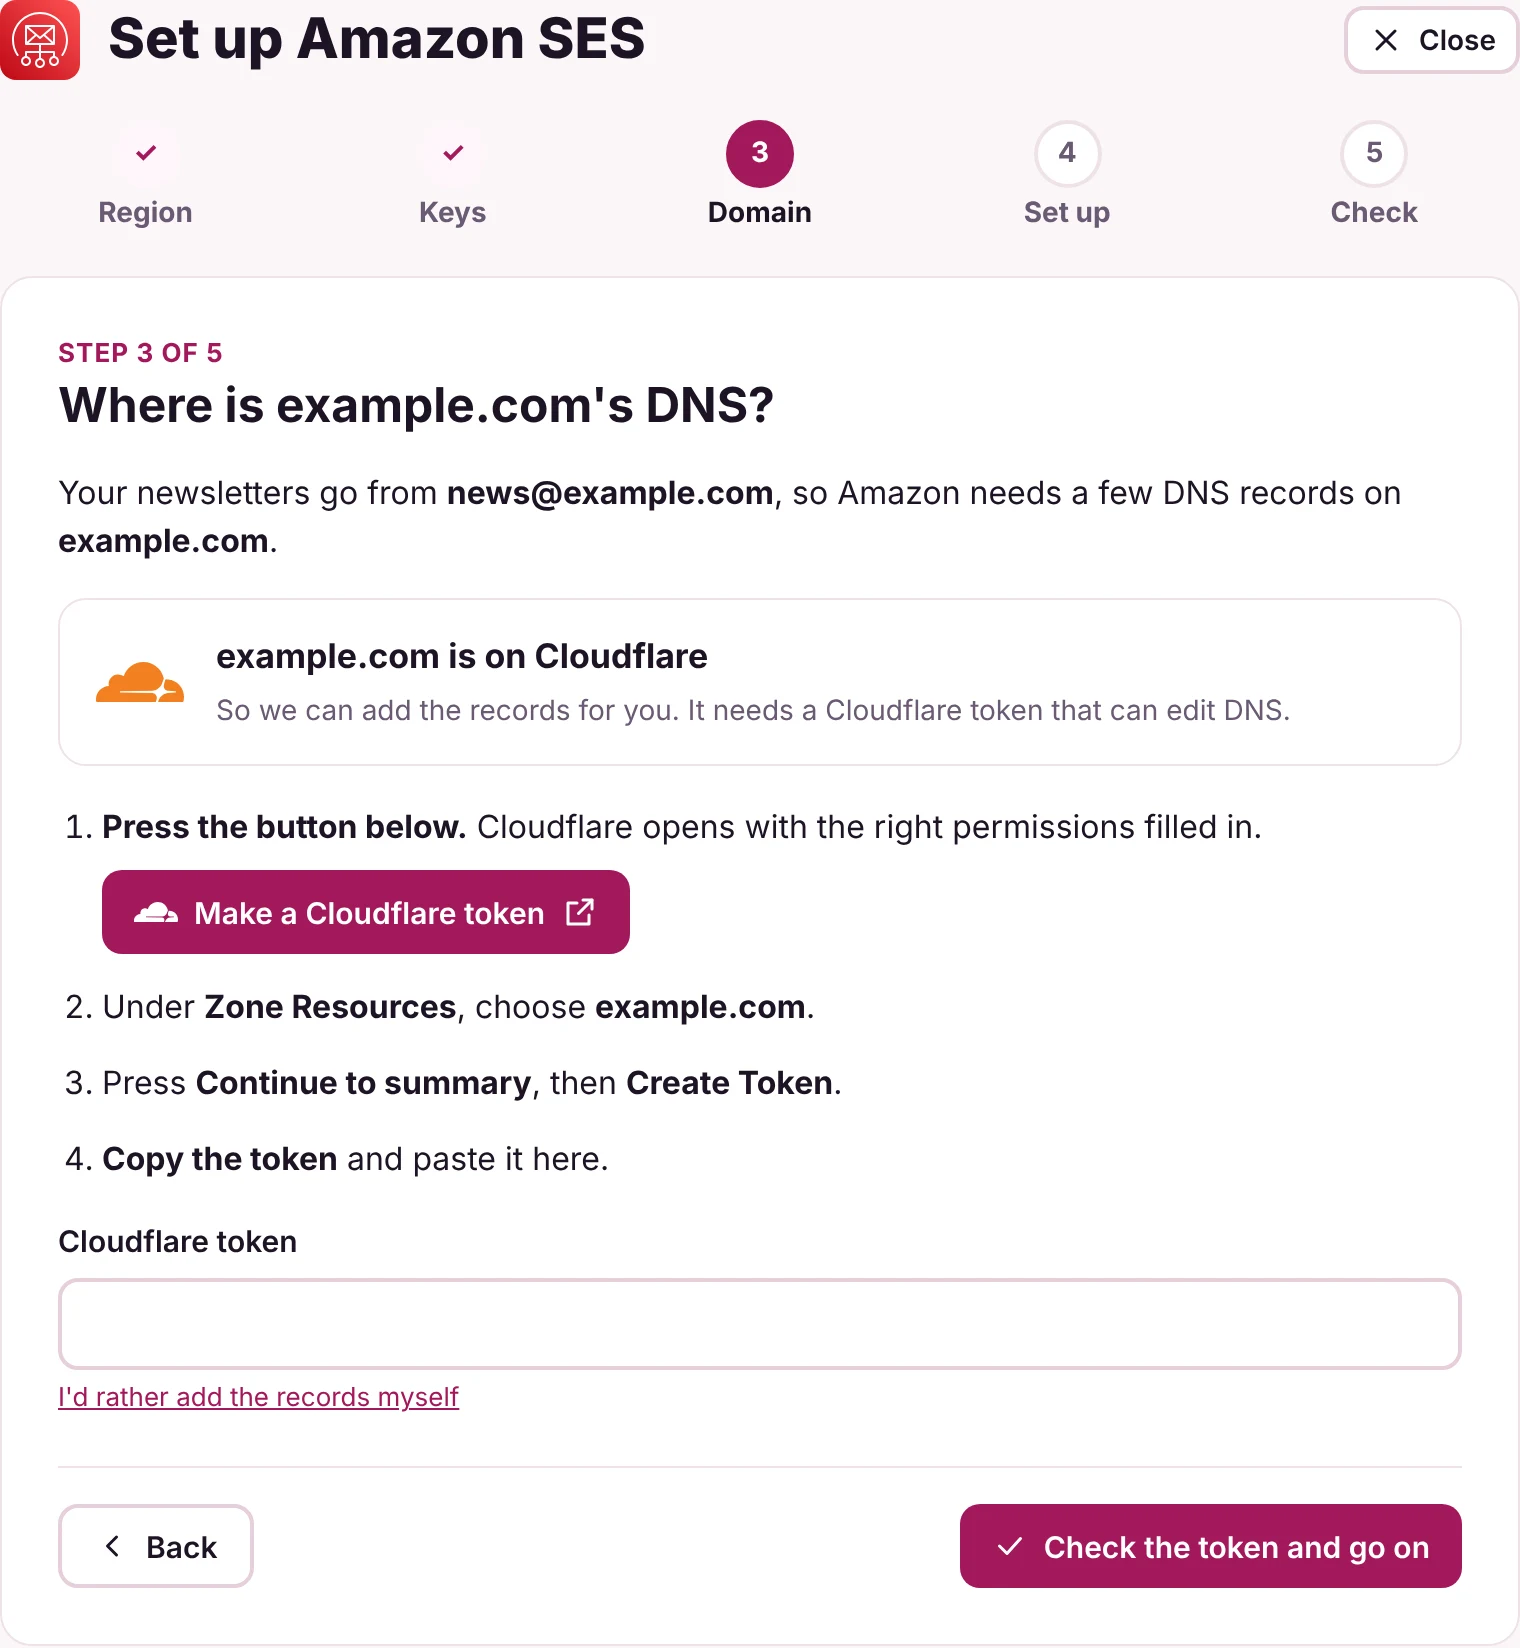
If your domain is on Cloudflare, Newsletter Sender can add the required DNS records automatically. It just needs an API token with DNS editing permissions:
- Click Make a Cloudflare token. Cloudflare will open the Create API token page in a new tab, with the name Newsletter Sender DNS and all the permissions it needs already filled in. Sign in if prompted.
- Under Zone Resources, select your sending domain. Limiting the token to this one domain means it can't see or change any of your other domains.
- Click Continue to summary, then Create Token.
- Click Copy next to the new token. Cloudflare won't show it again.
- Return to the wizard, paste it into Cloudflare token and click Check the token and continue. Prefer to manage DNS yourself? Click I'd rather add the records myself.
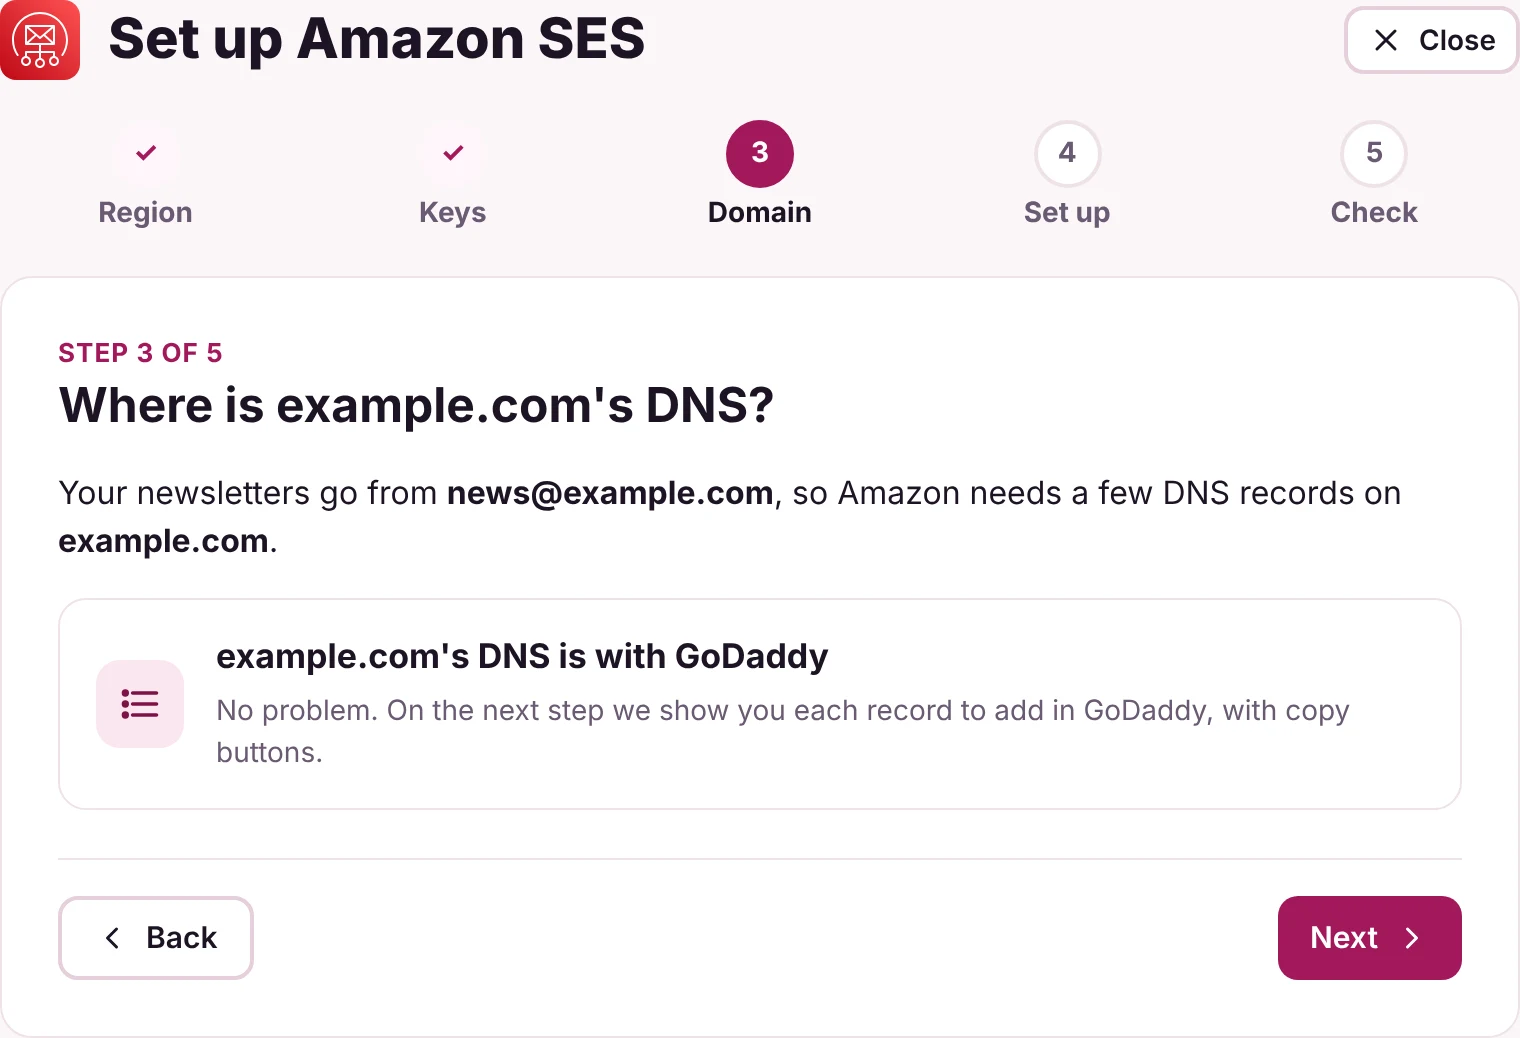
If your DNS is hosted elsewhere, the wizard shows your provider (such as GoDaddy or Namecheap) and displays the exact records to copy across on the next screen.
- Click Next to carry on.
Step 4: Set up
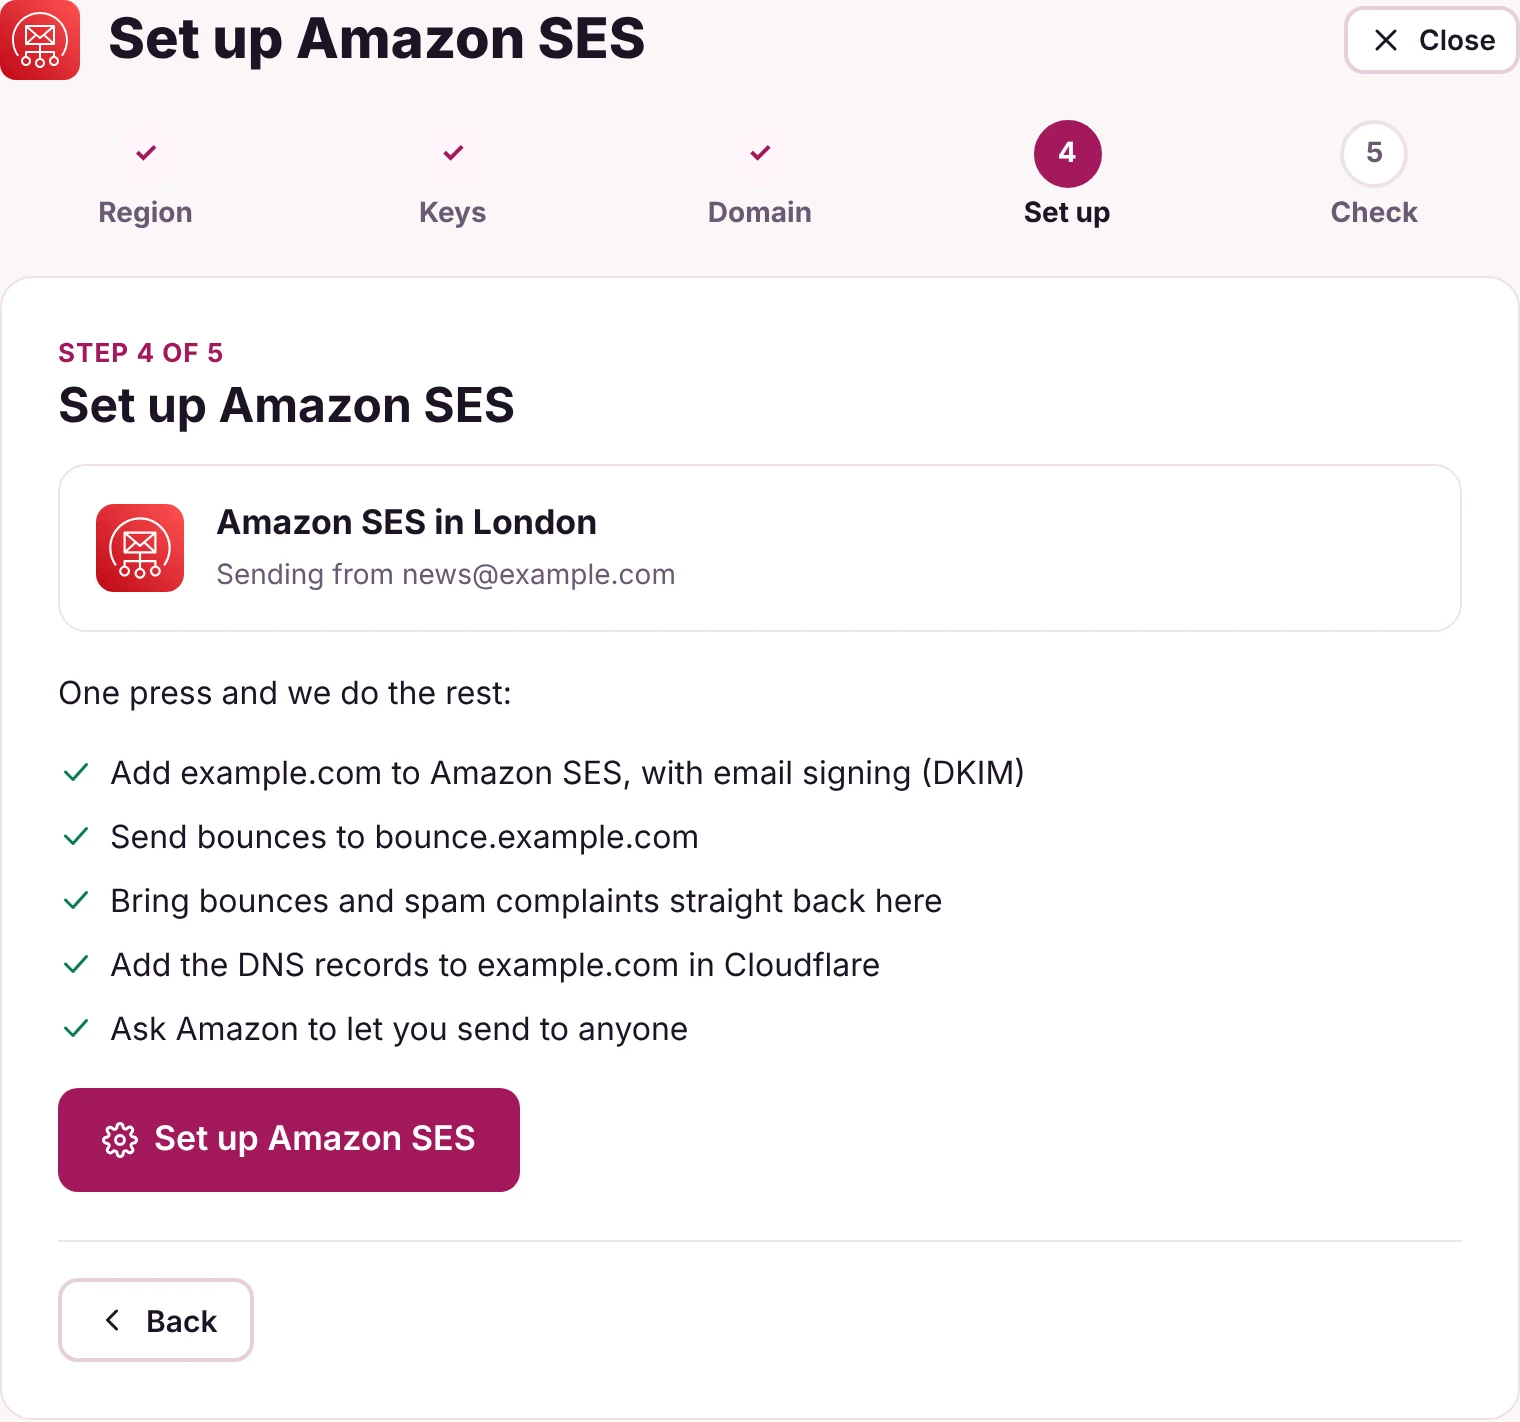
- Click Set up Amazon SES. With a single click, Newsletter Sender:
- Adds and verifies your domain in Amazon SES with Easy DKIM email signing.
- Sends bounces to their own subdomain (
bounce.yourdomain.com), keeping your main inbox clean. - Sets up Amazon SNS to feed bounces and spam complaints back into Newsletter Sender automatically.
- Adds the required DNS records (DKIM, SPF and DMARC) automatically if your domain is on Cloudflare.
- Sends an automatic production access request to lift Amazon's SES sandbox limits.
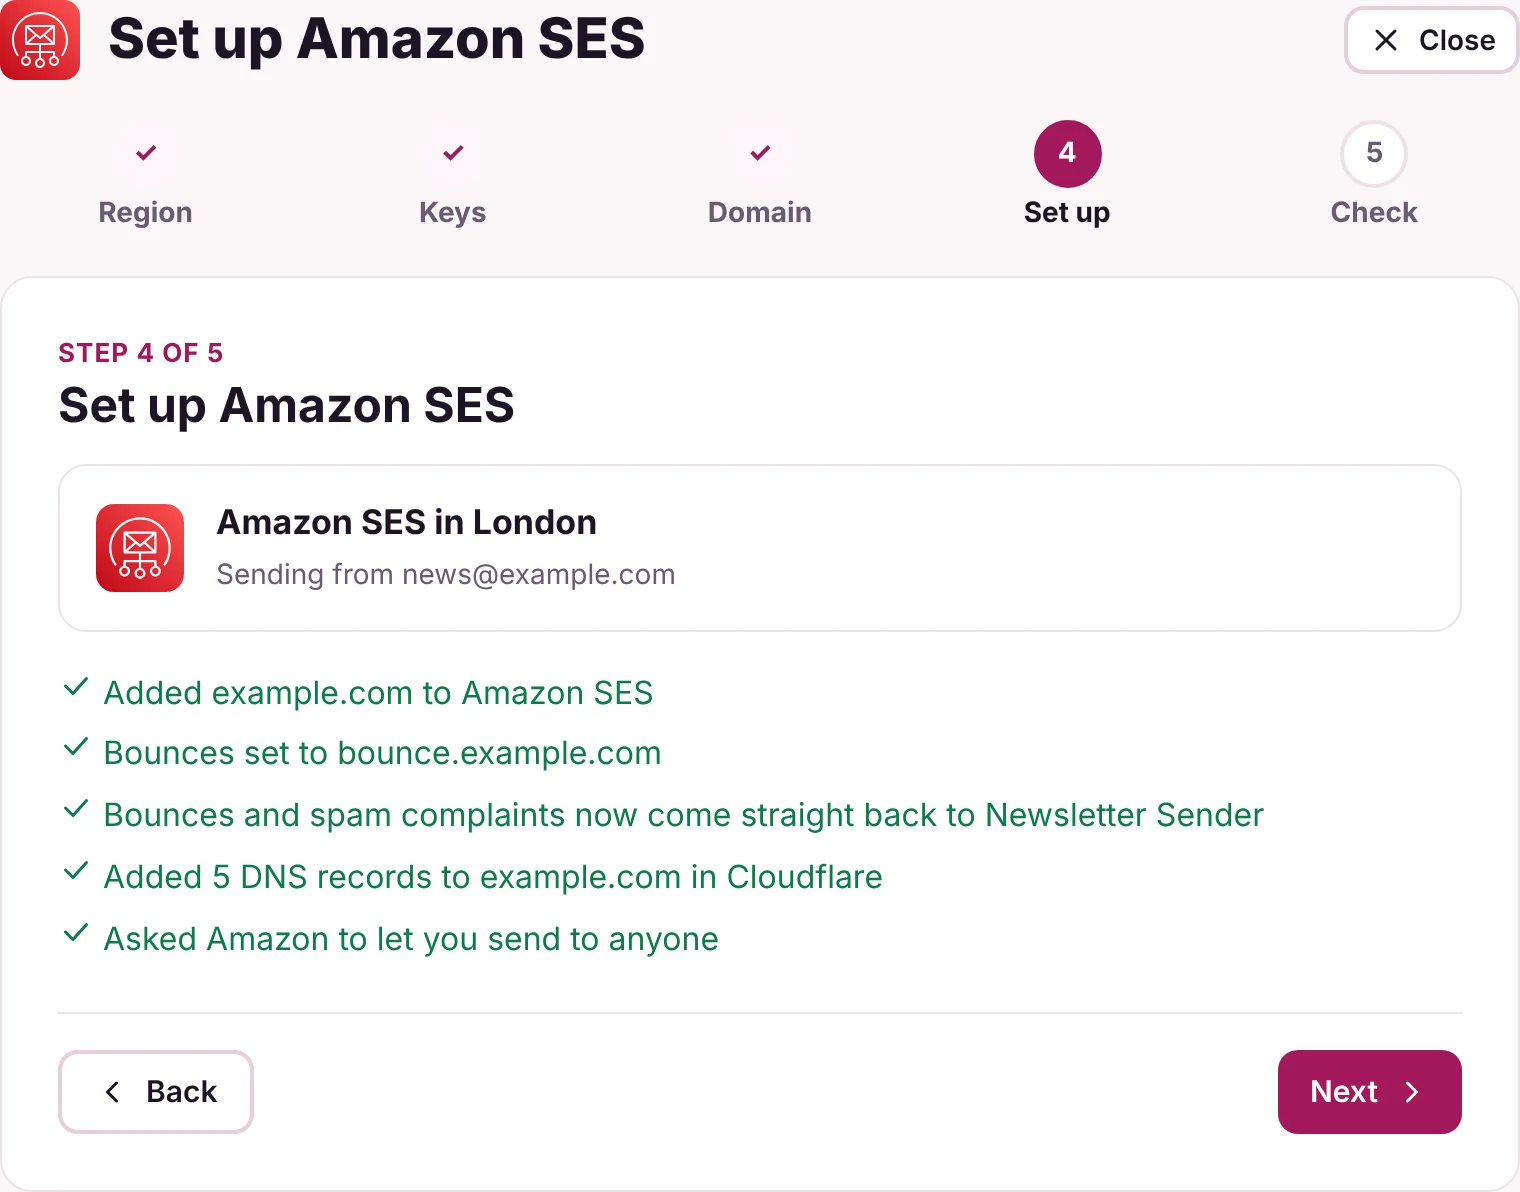
- If your DNS is hosted elsewhere, add each record shown on screen at your DNS host. Use the copy buttons next to each name and value. See DNS hosted elsewhere for tips.
- Click Next.
Step 5: Final checks
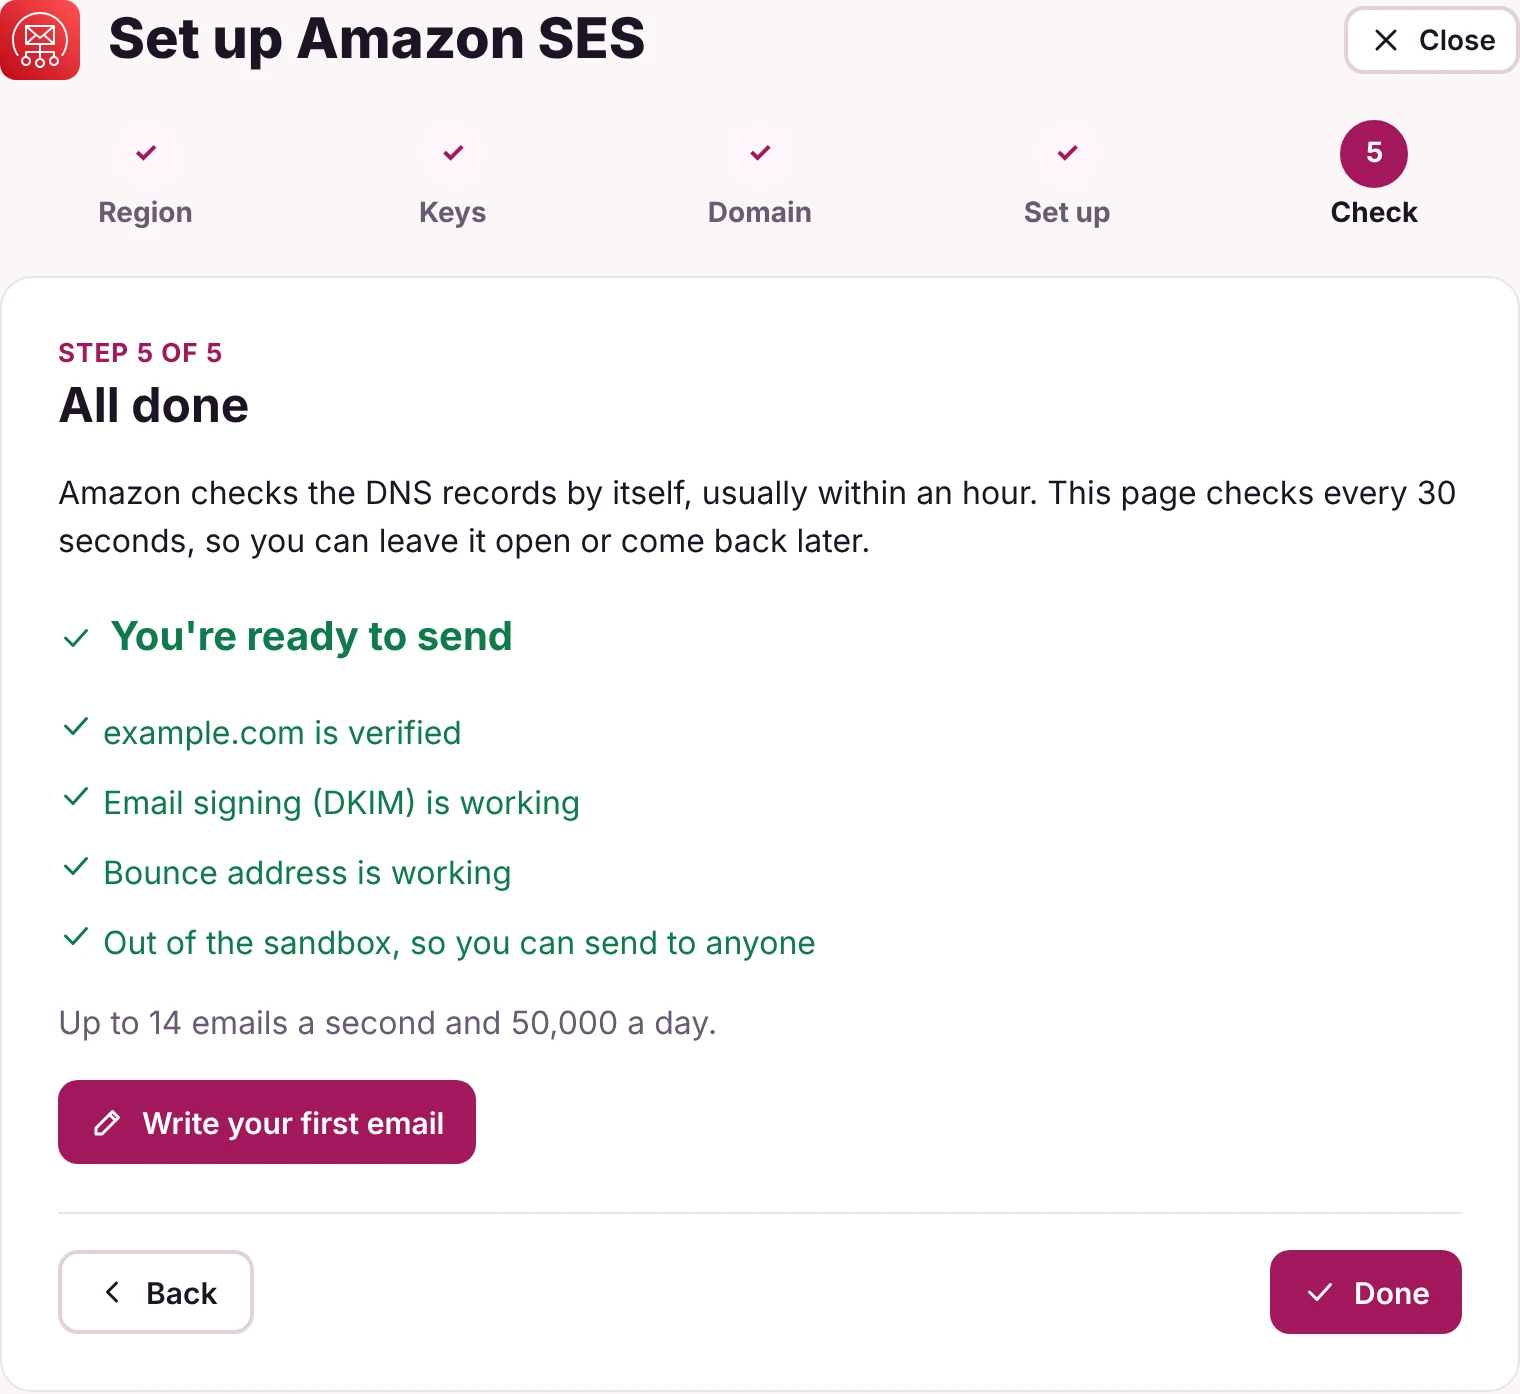
- Wait for the status to read You're ready to send. Amazon checks the DNS records automatically, usually within an hour. AWS typically reviews and approves production access requests by email within 24 hours. The wizard checks with AWS every 30 seconds, so you can leave the tab open, or close it and come back later.
- Click Write your first email to begin drafting, or Done to return to your dashboard.
3What the wizard sets up
Here is a complete breakdown of what's created in your accounts. Nothing else in your accounts is changed or accessed.
In AWS (CloudFormation stack: newsletter-sender)
| What | Purpose |
|---|---|
| IAM user | Limited strictly to Amazon SES and SNS. It has no console access and can't touch anything else in your AWS account. |
| IAM access key | The keys Newsletter Sender uses, stored encrypted inside your Cloudflare account and never shown in plain text. |
Private S3 bucket (newsletter-sender-backups-[account]-[region]) | Off-site storage for nightly backups, independent of Cloudflare. Encrypted, completely private, and each copy is deleted automatically after 31 days. |
| S3 add only permission | Lets the key add backups and nothing more. It can't read, change or delete existing backups, protecting your data even if the key were ever stolen. |
In Amazon SES
| What | Purpose |
|---|---|
| Your domain with DKIM | Lets inboxes check your emails really come from you. |
Custom MAIL FROM (bounce.yourdomain.com) | Sends bounces back to Amazon SES instead of cluttering your day to day inbox or changing your existing MX records. |
Configuration set (newsletter-sender) and SNS topic (newsletter-sender-events) | Sends bounce and complaint notices straight to Newsletter Sender, so those addresses are suppressed automatically. |
| Production access request | Asks AWS to take your account out of the sandbox, so you can send to anyone. |
In Cloudflare (if your DNS is on Cloudflare)
| Record | Name | Purpose |
|---|---|---|
| 3 × CNAME | *._domainkey.yourdomain.com | DKIM email signing. |
| MX and TXT | bounce.yourdomain.com | Lets SES handle bounces, and sets SPF for the bounce subdomain. |
| TXT | _dmarc.yourdomain.com | A starter DMARC policy, only added if your domain hasn't got one. An existing policy is never overwritten. |
newsletter-sender stack in the AWS CloudFormation console. This deletes the IAM user and its access key. As a safeguard, your S3 backup bucket is kept, so an accidental stack deletion never destroys your backups. When you're certain, empty and delete the bucket yourself in S3.4Manual setup
If your AWS permissions restrict CloudFormation, or you'd rather create the user and keys yourself, do it in the AWS IAM console. In Newsletter Sender, choose Amazon SES, then Set it up myself.
Part 1: Create a restricted IAM user
Newsletter Sender talks to Amazon through its own user, with only the permissions it needs. This user can't sign in to the AWS console.
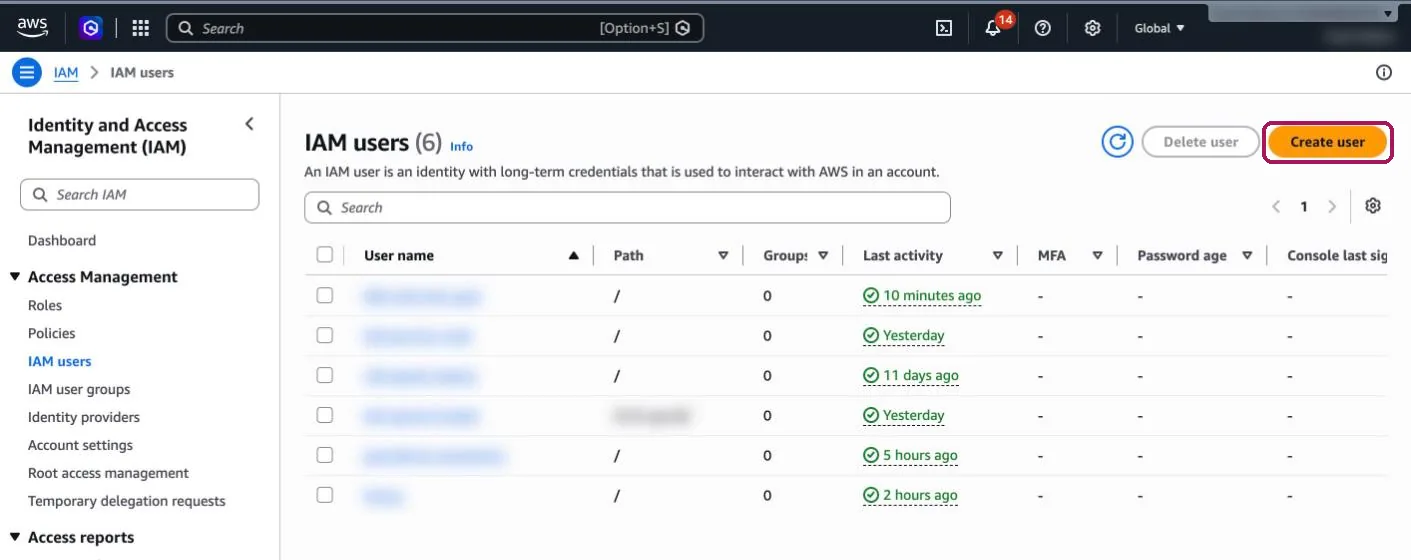
- Log in to the AWS Management Console and go to IAM → Users. Or type
IAMin the top search bar and click Users in the sidebar. - Click Create user.
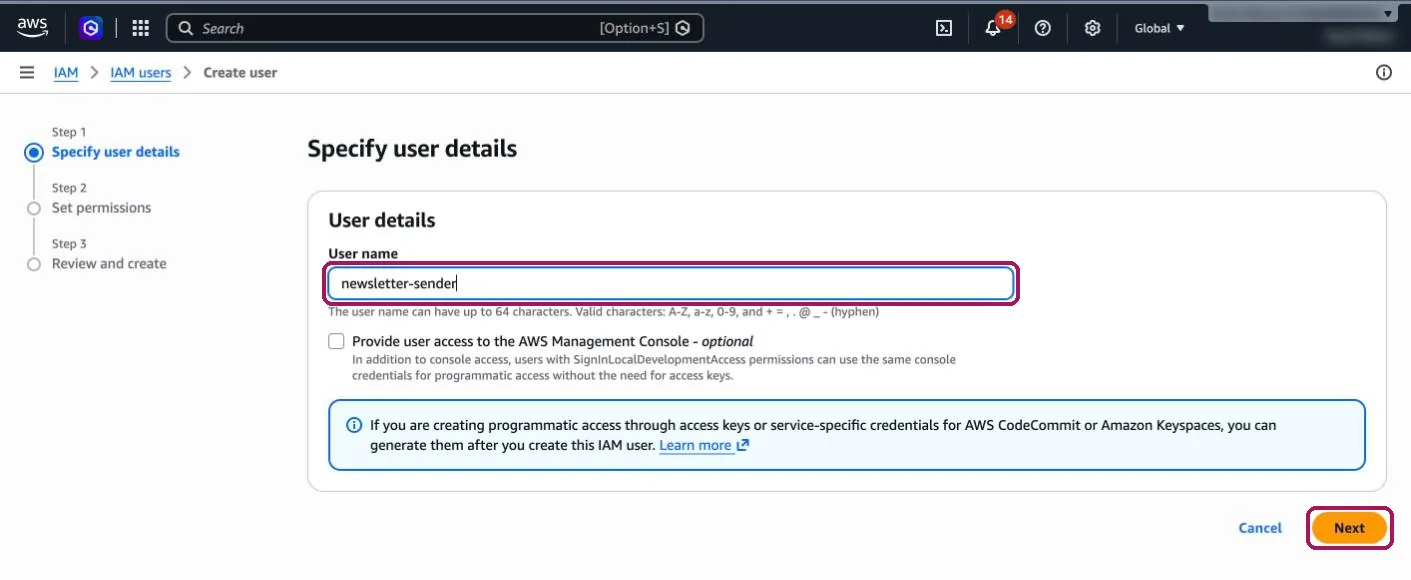
- Enter a user name, such as
newsletter-sender. - Leave Provide user access to the AWS Management Console unticked. Newsletter Sender only needs access through the API.
- Click Next.
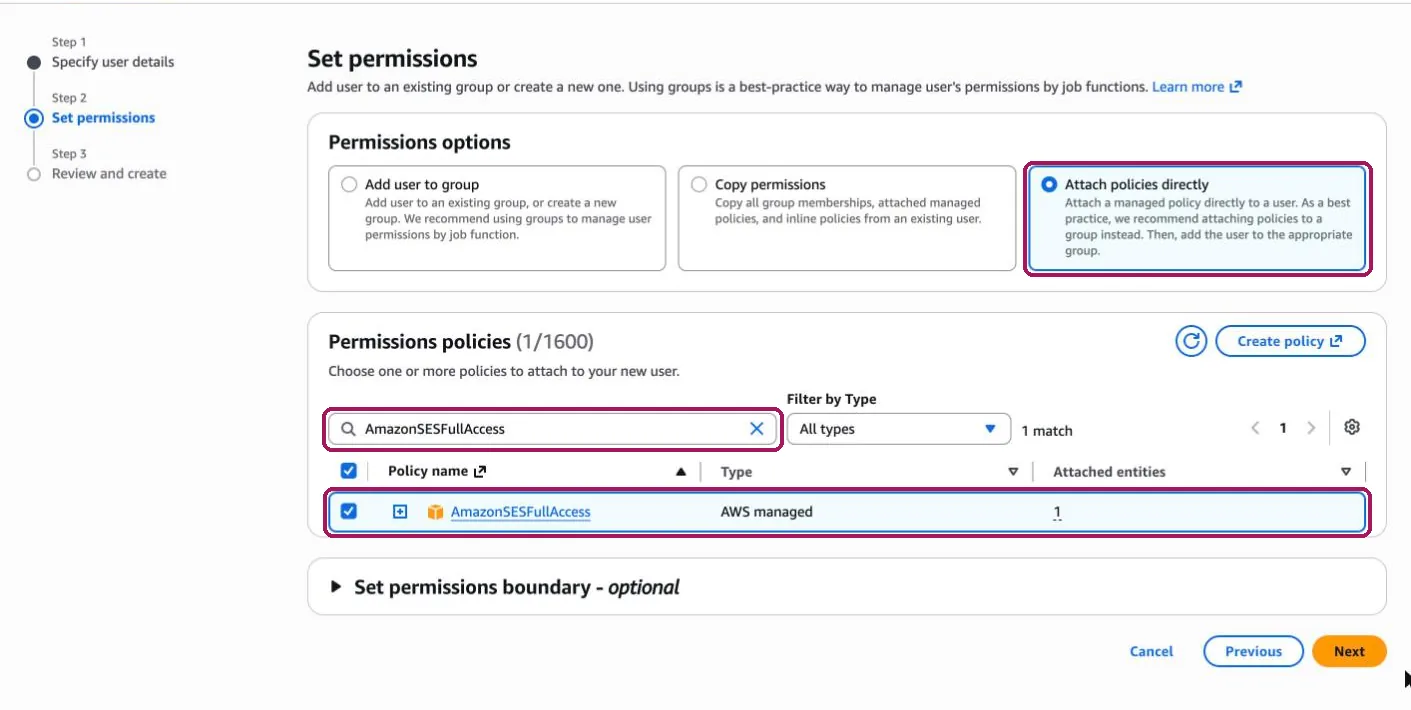
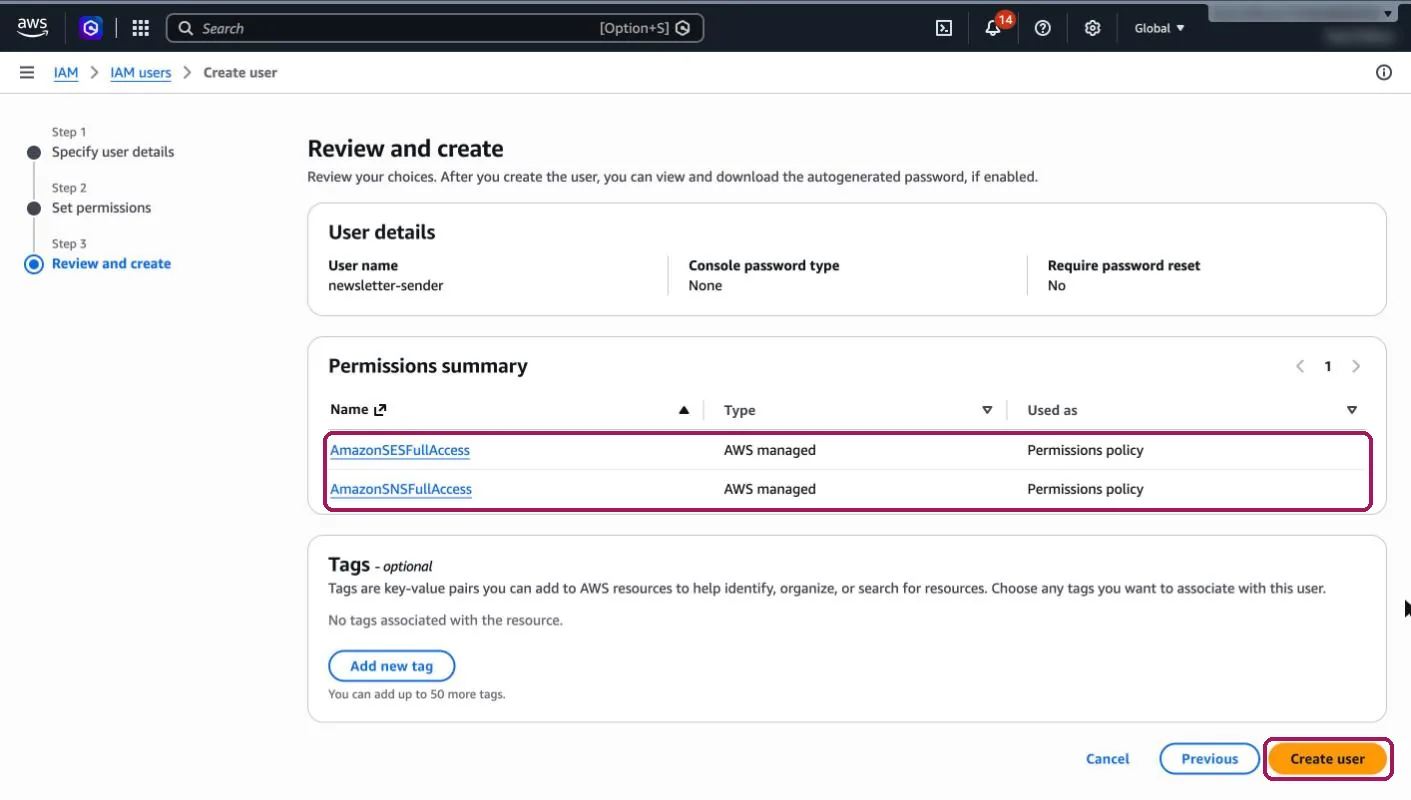
- Under Permissions options, select Attach policies directly.
- In the search box, search for
AmazonSESFullAccessand press Enter. This lets it send email and manage your domain in SES. - Tick AmazonSESFullAccess. Tick the box at the start of the row, not the name (the name opens a new tab).
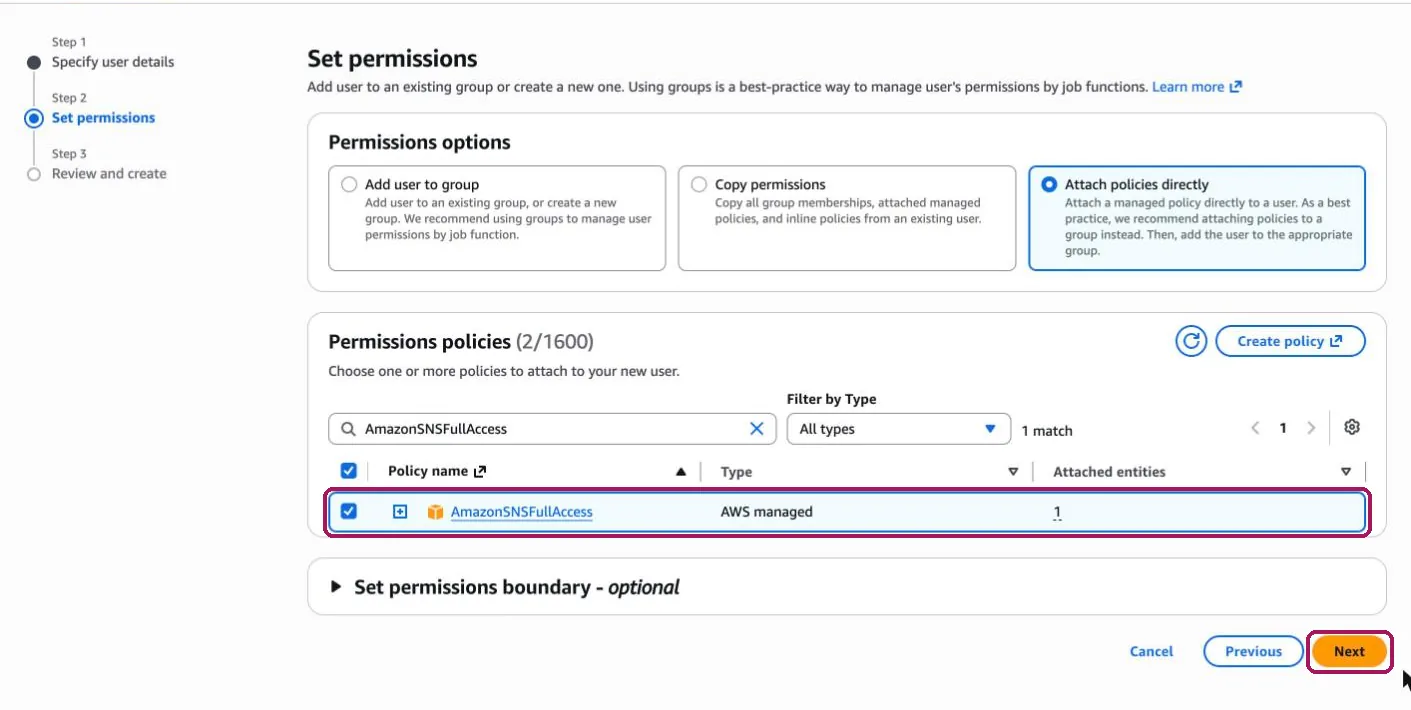
- Now search for
AmazonSNSFullAccessand tick it too. This lets Newsletter Sender hear about bounces and complaints straight away. The counter shows 2 chosen when both are ticked. - Click Next.
- Review the summary screen and click Create user.
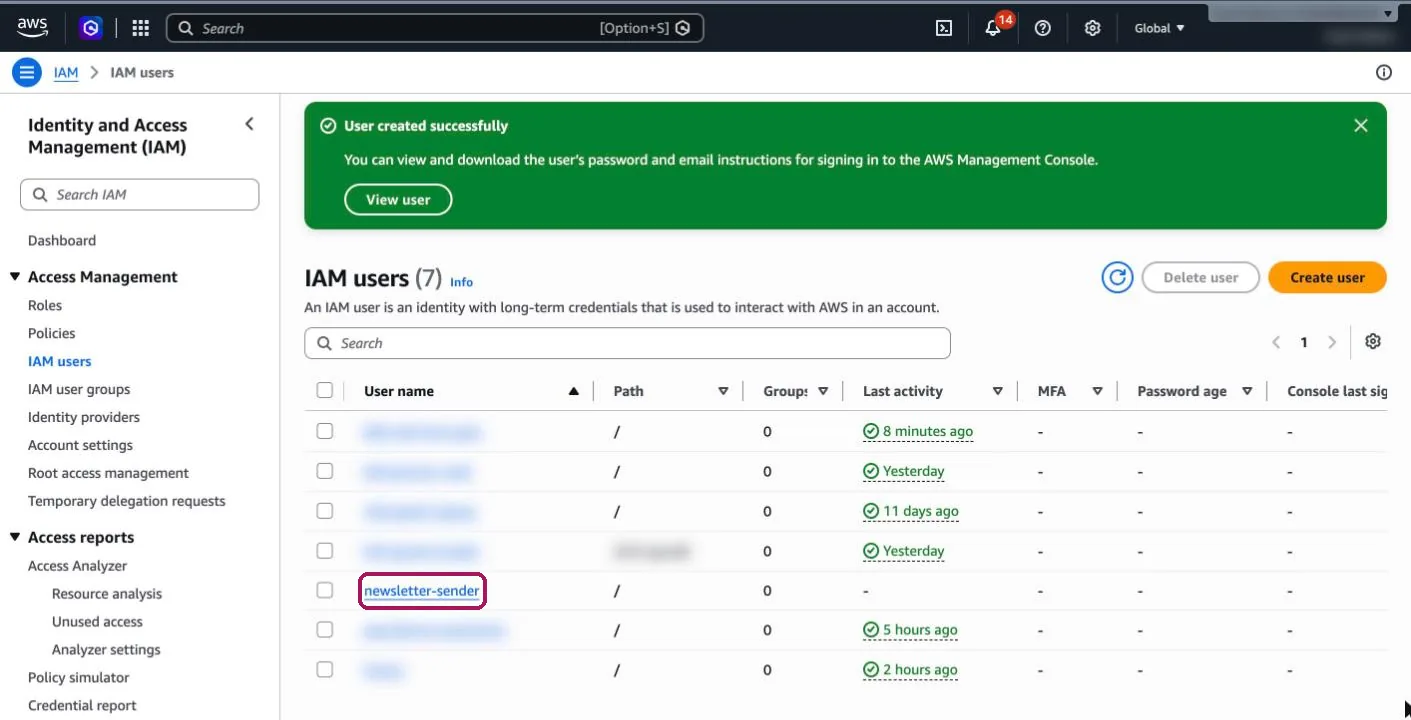
- In the list of users, click your new user (
newsletter-sender) to open its page.
Part 2: Generate access keys
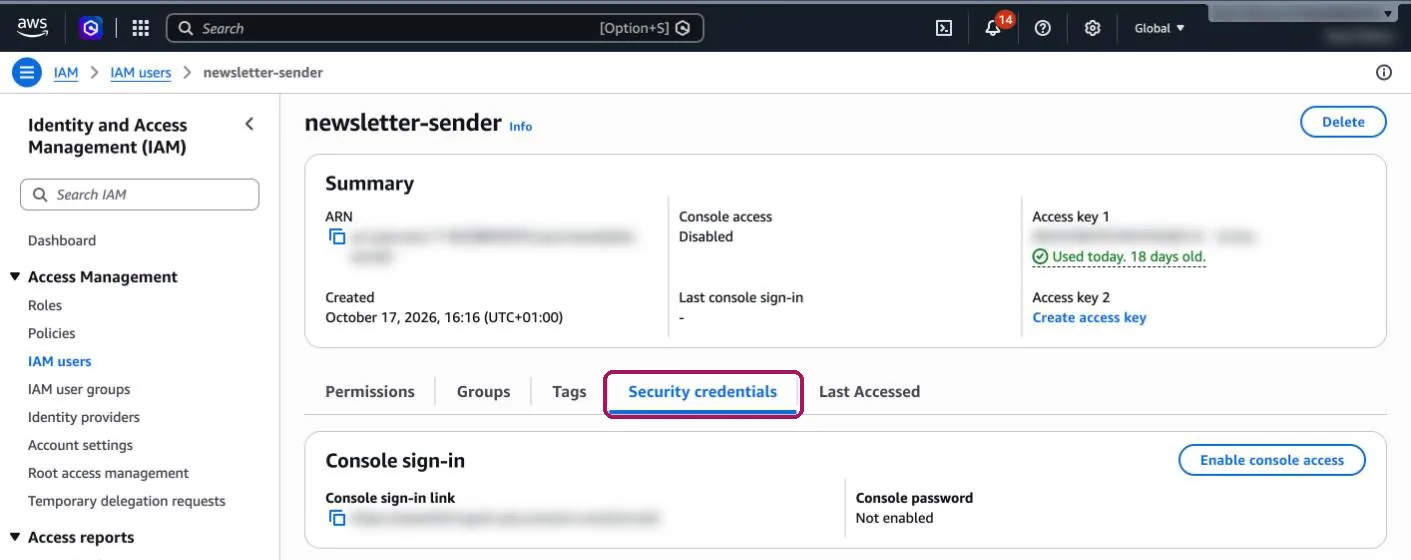
- On the user's page, select the Security credentials tab.
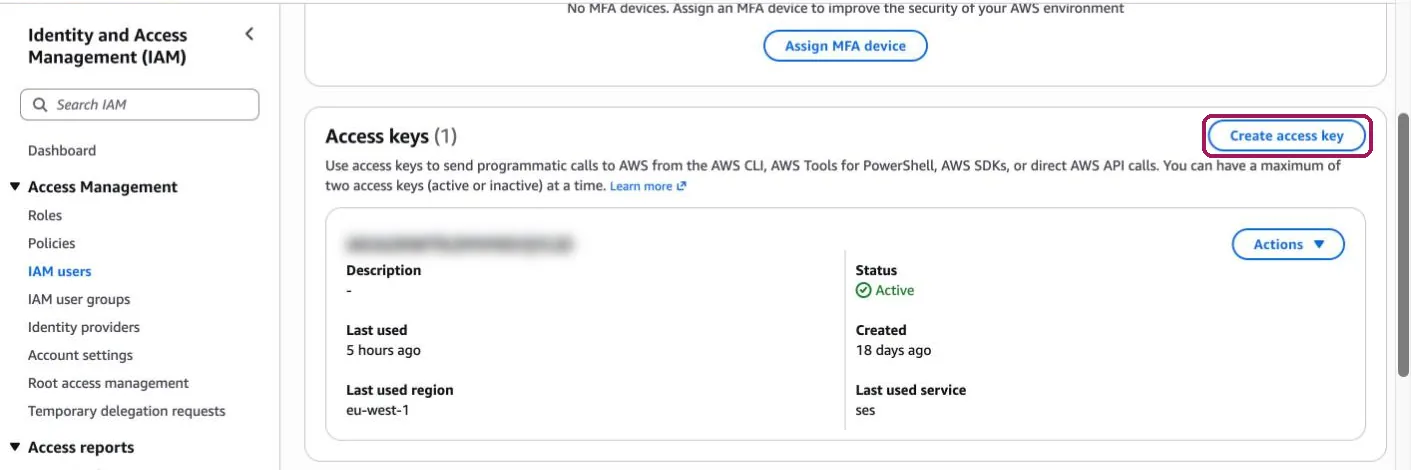
- Scroll to Access keys and click Create access key. A brand new user has no access keys yet, so this box will be empty.
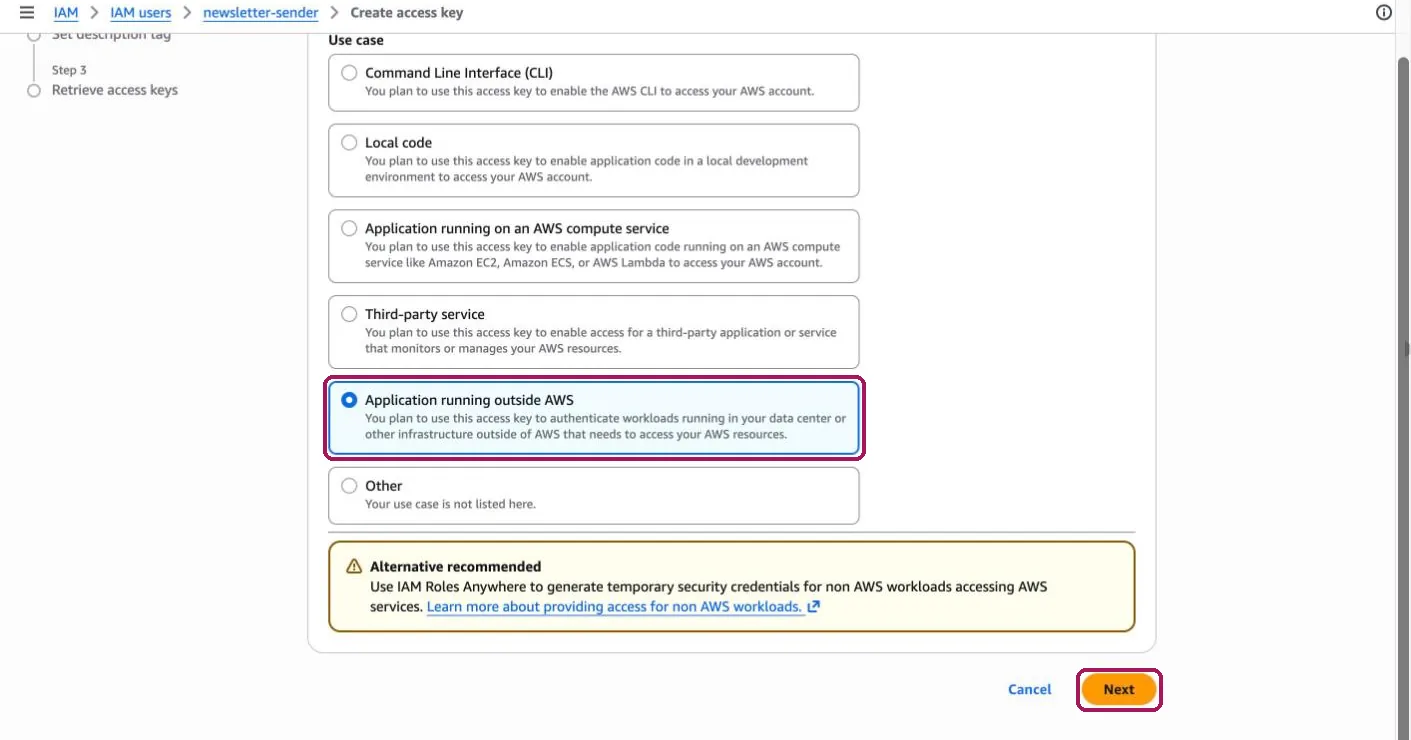
- Under Use case, select Application running outside AWS. Newsletter Sender runs on Cloudflare, which is outside AWS.
- Ignore the Alternative recommended notice and click Next. If you see a tick box under Confirmation, you've chosen a different option: go back and choose Application running outside AWS.
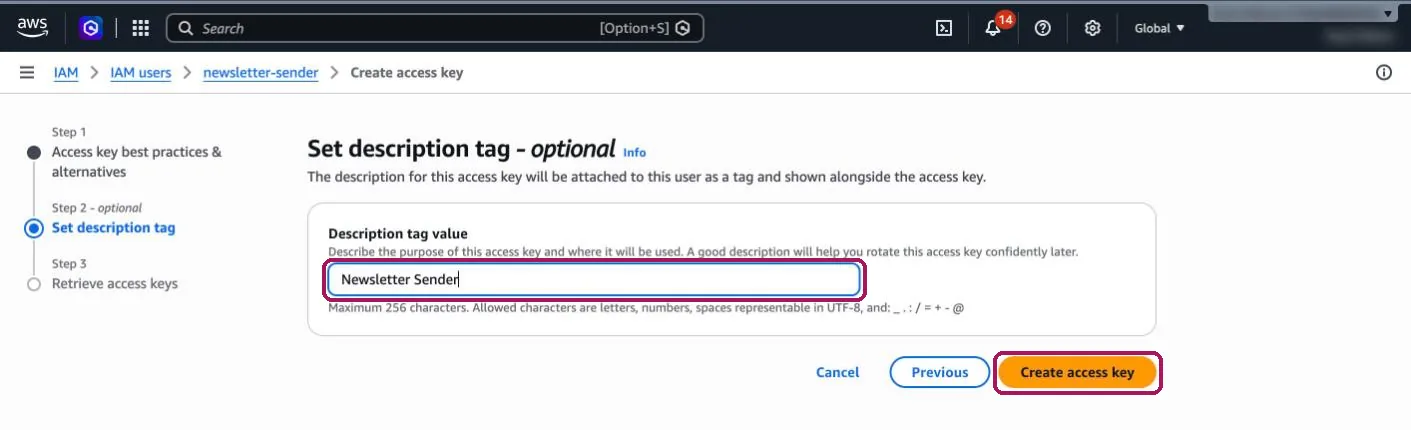
- (Optional) Add a description, such as
Newsletter Sender, to identify this key later. - Click Create access key.
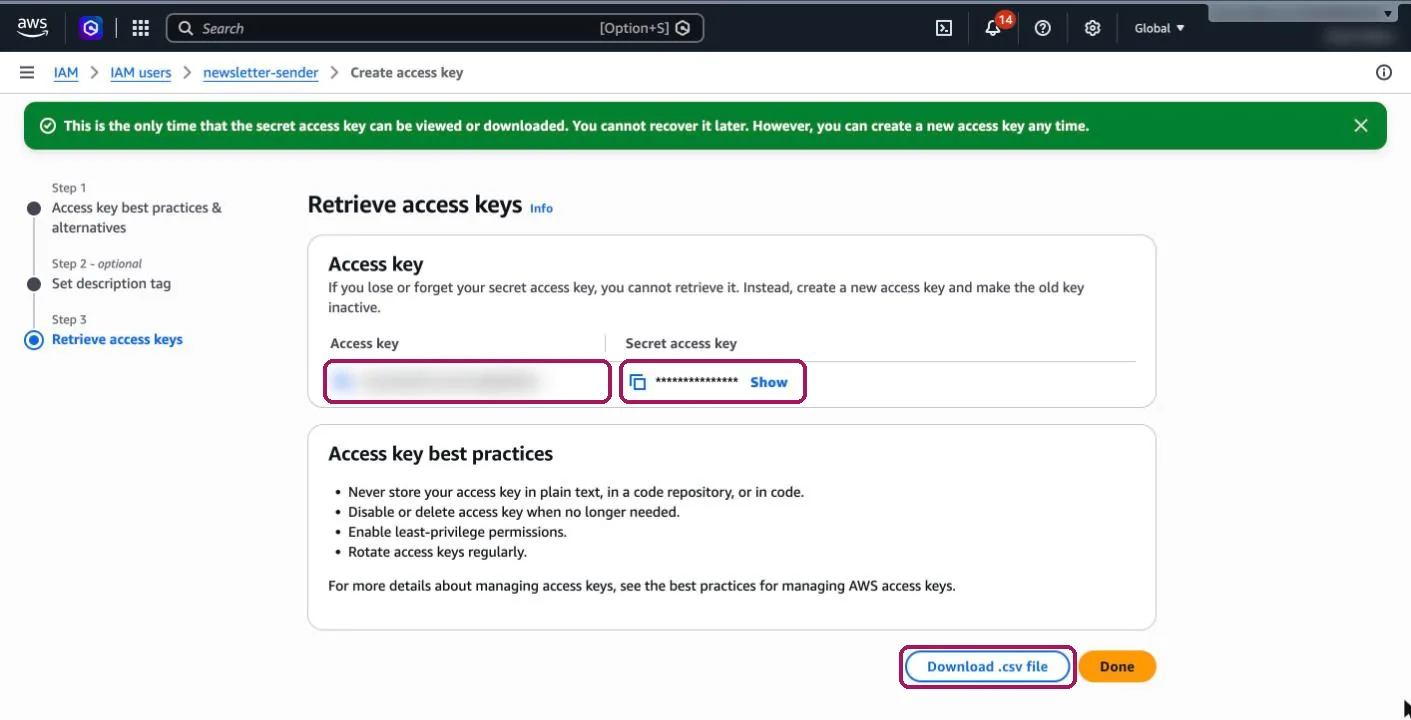
- Save your keys straight away. Copy the Access key (it starts
AKIA), and click Show under Secret access key to copy it. - Click Download .csv file and keep it in your password manager. Then delete the download.
5Part 3: Connect your keys to Newsletter Sender
- In Newsletter Sender, go to Settings → Sending, choose Amazon SES and select Set it up myself.
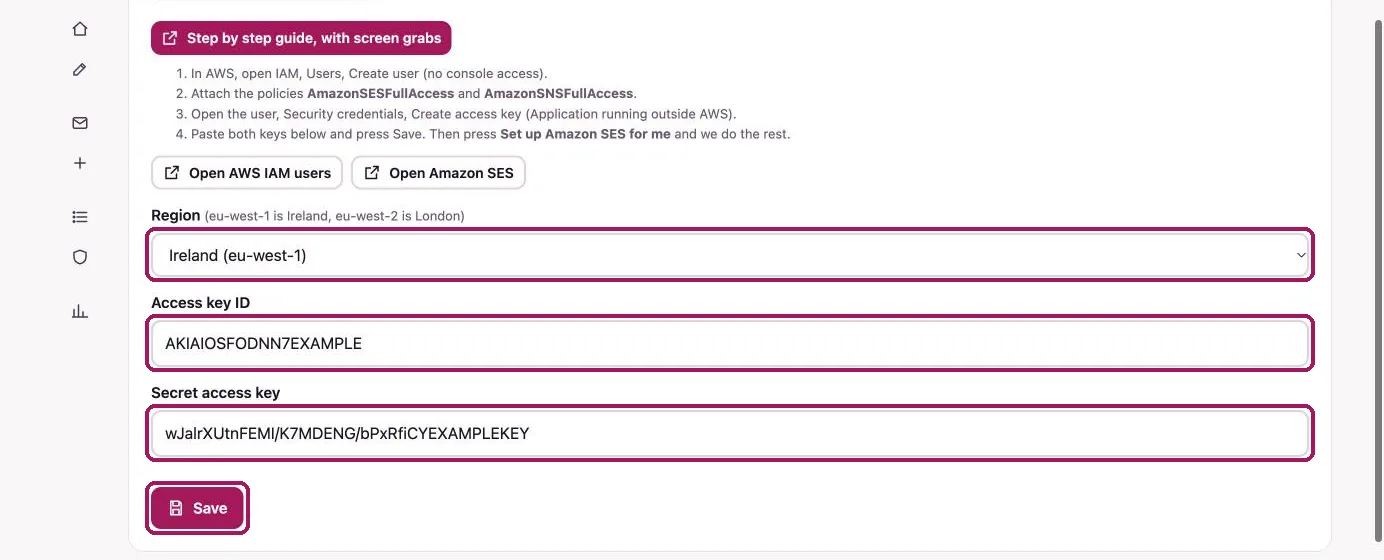
- Select your AWS Region. Make sure it matches the region you used in AWS.
- Paste your Access key ID and Secret access key into their boxes. Copy them cleanly from AWS so no stray spaces come across.
- Click Save. Newsletter Sender checks the keys with AWS before saving. Your keys are stored encrypted inside your own Cloudflare account, and only the last few characters are ever shown again.
You'll see Sending through Amazon SES. Next, the DNS records.
6Add the DNS records
Amazon needs six DNS records on your domain before it lets you send. If your domain's DNS is on Cloudflare, Newsletter Sender can add them automatically using an API token. If your DNS is hosted elsewhere, see DNS hosted elsewhere below.
Option A: Your DNS is on Cloudflare
- In Newsletter Sender, open Is your domain on Cloudflare? We can add the DNS records for you.
- Click Make a Cloudflare token. Cloudflare's Create API token page opens in a new tab. Sign in if prompted.
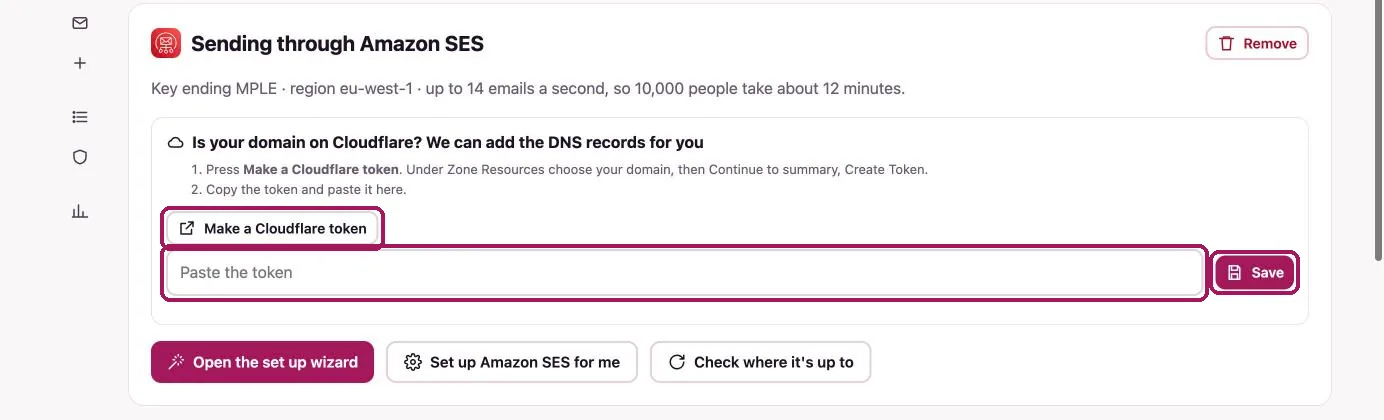
- The token is already named Newsletter Sender DNS with its permissions chosen. They let Newsletter Sender read your domain and manage its DNS records, nothing else. Leave them as they are.
- Under Zone Resources, select your sending domain. Limiting the token to this one domain means it can't see or change any other domains in your Cloudflare account.
- Click Continue to summary, then Create Token.
- Click Copy next to the token. Cloudflare shows it only once. If you leave the page before copying it, you'll need to make a new one.
- Return to Newsletter Sender, paste it into Paste the token and click Save. You'll see Your domain is on Cloudflare, so we add the DNS records for you.

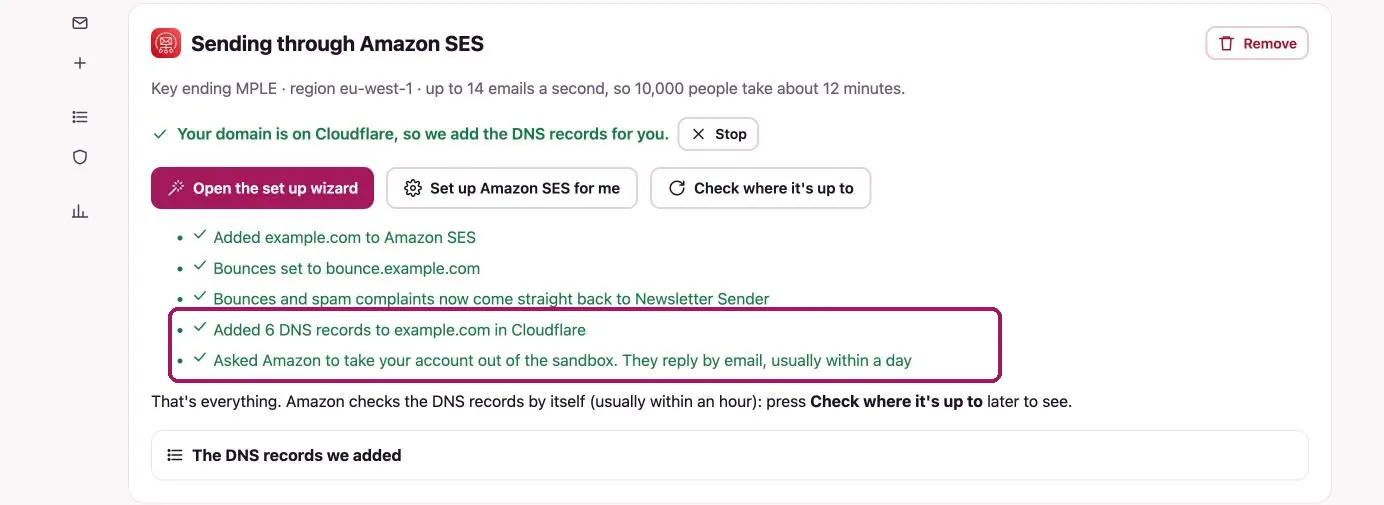
- Click Set up Amazon SES for me. It takes a few seconds.
That one button does all of this across your AWS and Cloudflare accounts:
- Adds your domain and DKIM signing in Amazon SES, so receiving email servers can check your messages come from your domain.
- Sends bounces to
bounce.yourdomain.com, keeping them well away from your day to day inbox. - Sets up Amazon SNS to send bounces and spam complaints straight back to Newsletter Sender, which stops emailing those addresses.
- Adds the DNS records to Cloudflare as DNS only (grey cloud), so Amazon can see them. A starter DMARC record is only added if your domain hasn't got one.
- Asks AWS to lift the sandbox with an automatic production access request (see below).
Option B: DNS hosted elsewhere
If your DNS is with a provider such as GoDaddy or Namecheap, click Set up Amazon SES for me without a Cloudflare token. It sets up the AWS side, then shows the exact records to add at your DNS host. Each name and value has its own copy button.
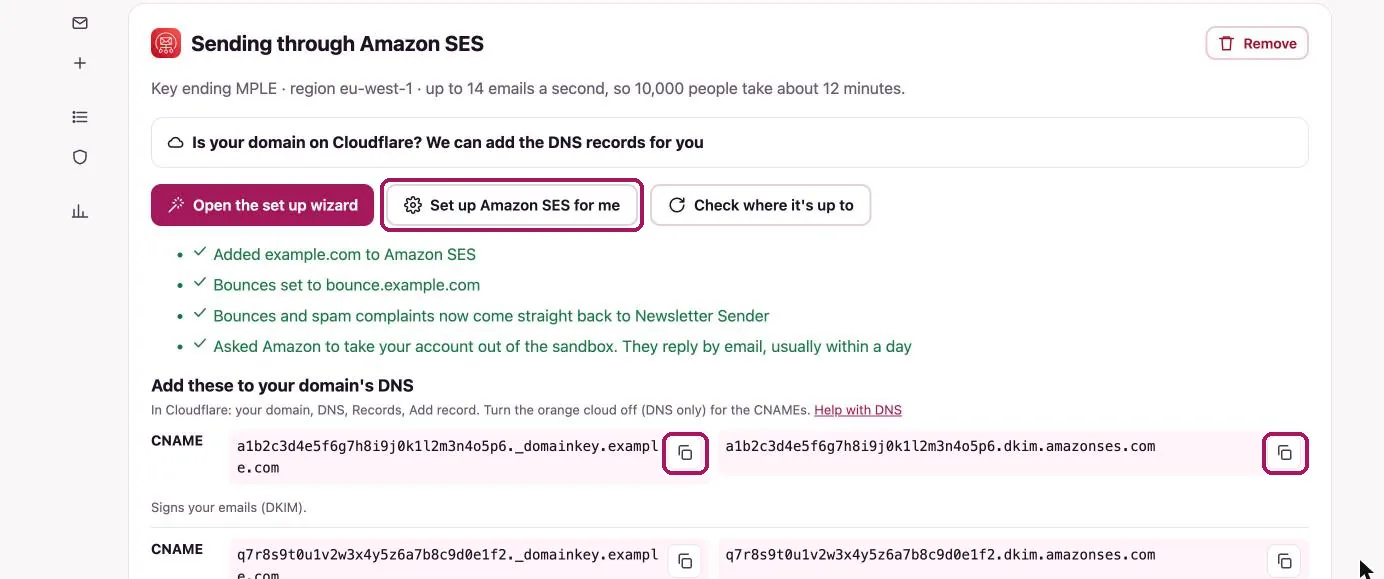
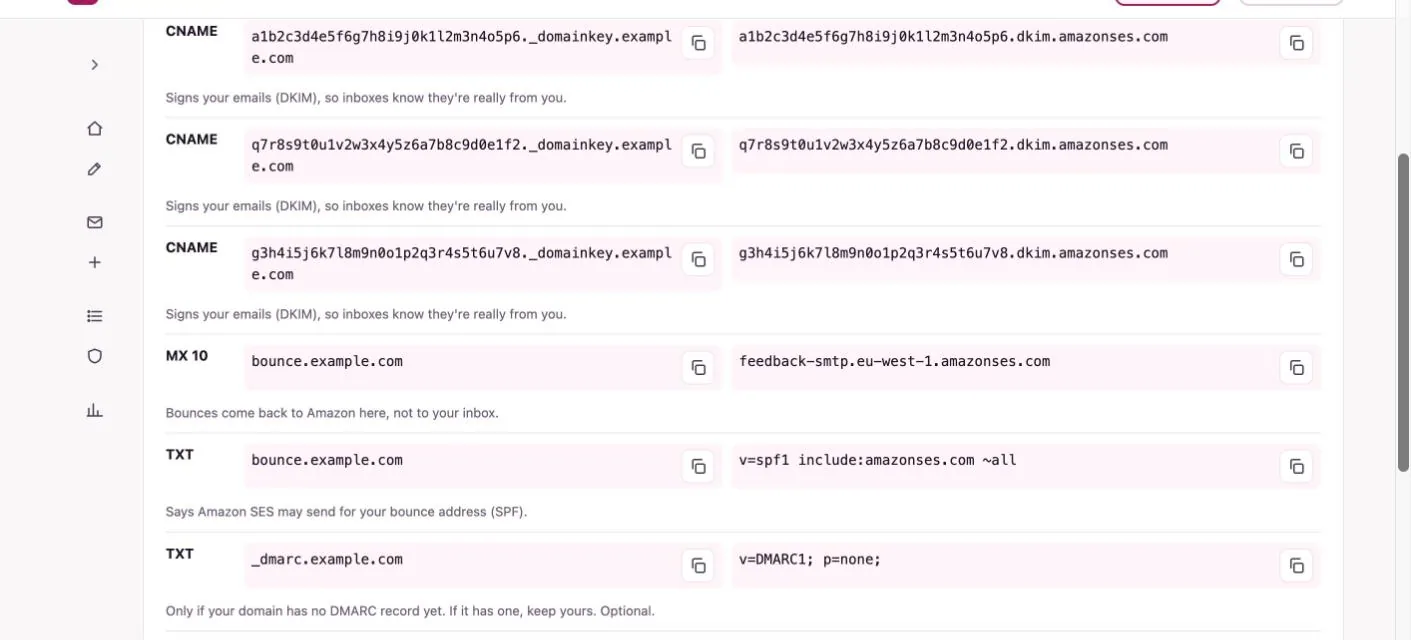
- At your DNS host, add each record with the Type shown (CNAME, MX or TXT). Some hosts want only the part before your domain in the name box, such as
bounceinstead ofbounce.yourdomain.com. - Copy the name from Newsletter Sender into your host's Name or Host box, and the value into Target, Points to or Value.
- For the MX record on the bounce subdomain, set the priority to
10. - Add all six records, or five if your domain already has a DMARC record. Always keep your existing DMARC policy.
7Check it's working
- In Newsletter Sender, click Check where it's up to. Amazon checks the DNS records automatically, usually within an hour. You can click it again at any time for a live status check.
- Make sure each line shows a green tick: your domain can send, Signing (DKIM): success and Bounce address: success.
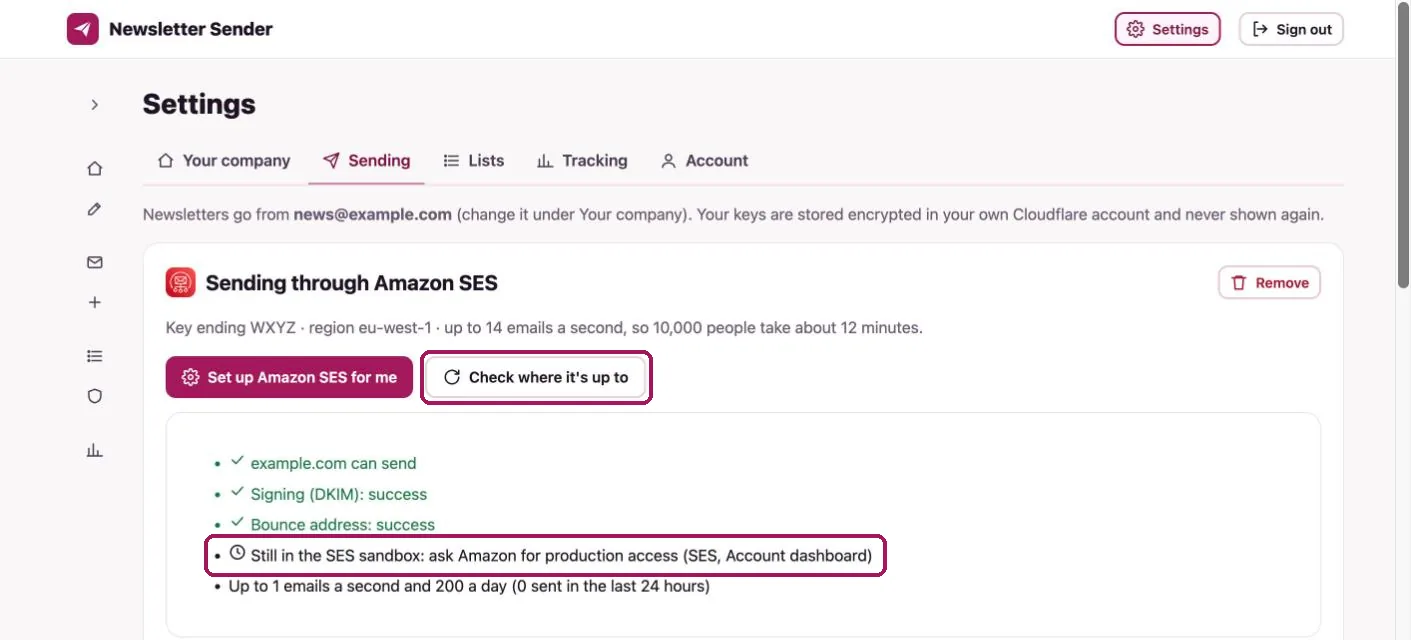
The last two lines show whether you're still in the Amazon SES sandbox and how fast you can send. New AWS accounts start at 1 email a second and 200 a day, and can only send to addresses you've verified.
8Leave the SES sandbox
Every new Amazon SES account starts in the sandbox. The setup (the wizard or Set up Amazon SES for me) sends the production access request for you, filling in the details:
| Field | What we fill in |
|---|---|
| Mail type | Marketing (newsletters are marketing email) |
| Website | https://yourdomain.com, from your From address |
| How you send | People sign up on your website and confirm by email (double opt in), every email has a one click unsubscribe link, and bounces and complaints are removed automatically. |
A person at AWS reviews it and replies by email, usually within 24 hours. You don't need to do anything else. Once you're approved, click Check where it's up to: the sandbox line turns green and your sending speed goes up.
Requesting production access yourself
Only if Newsletter Sender shows We couldn't ask Amazon to take you out of the sandbox. Make sure the AWS console is set to the same region you chose at the start.
- Go to Amazon SES → Account dashboard. Check the region at the top right matches yours, and that the banner says Your Amazon SES account is in the sandbox.
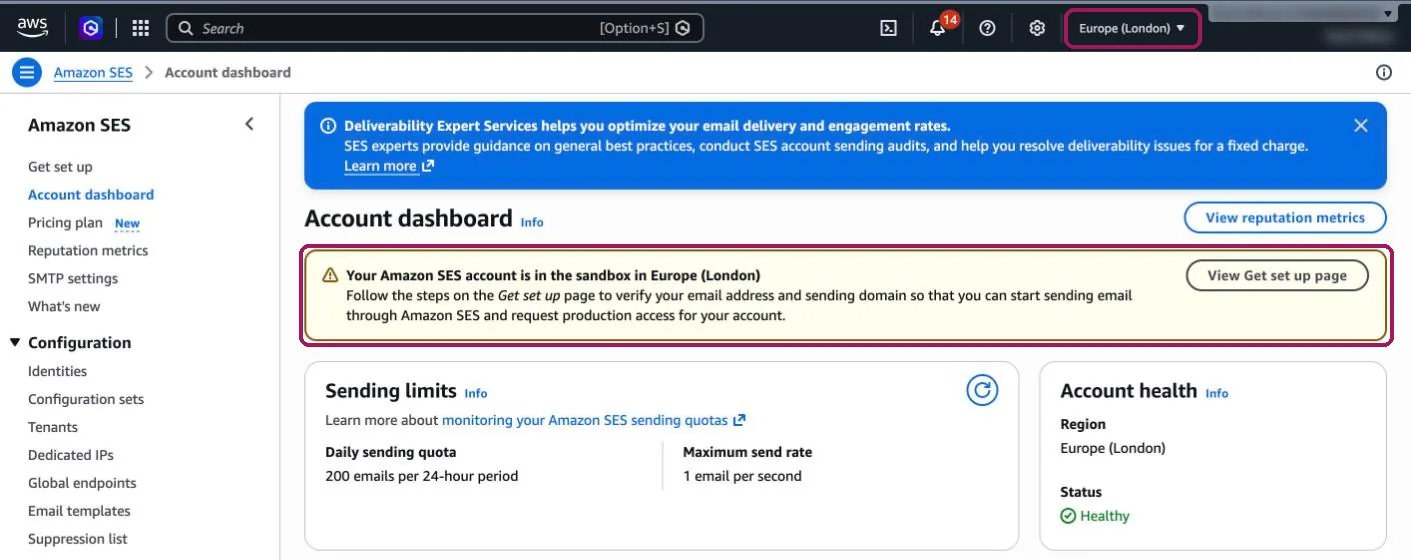
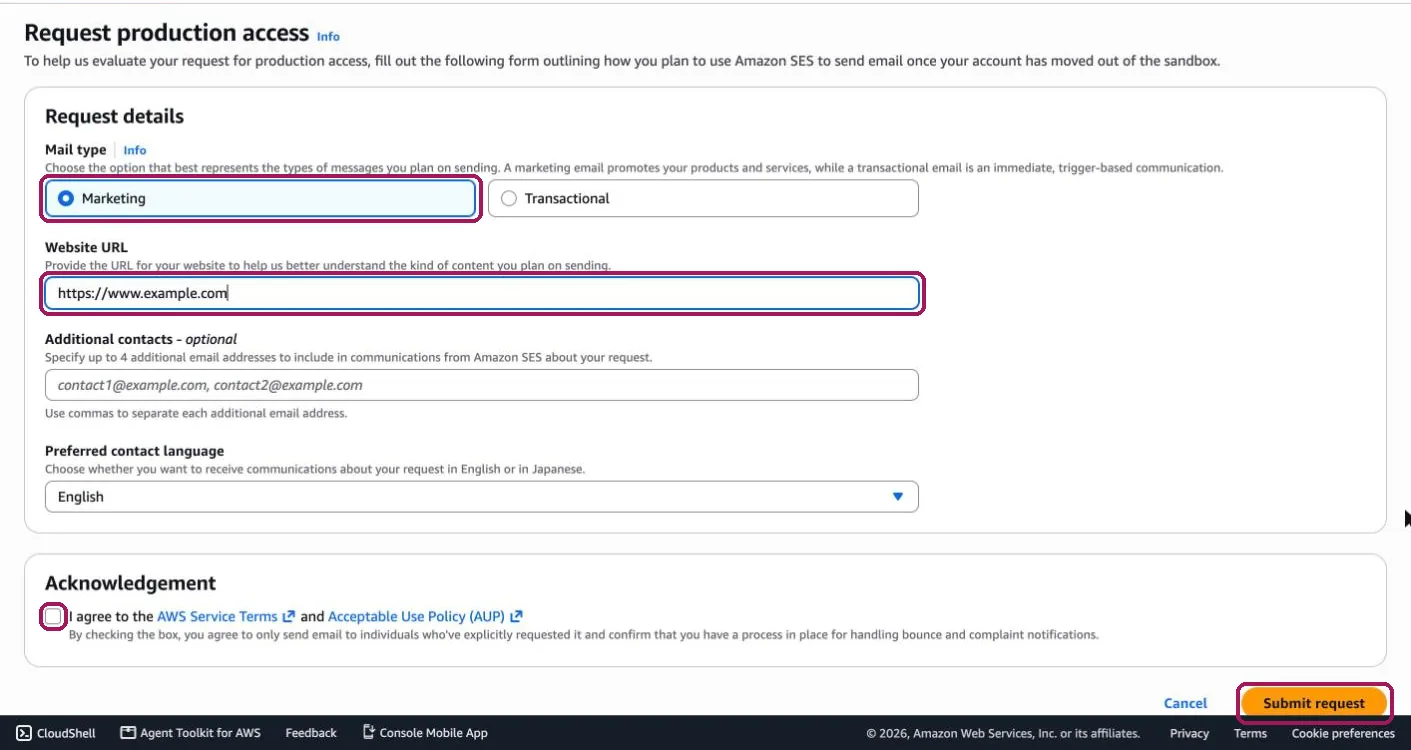
- Click Request production access. It's on the dashboard, or under Get set up in the sidebar. You can also go straight to the request form.
- Under Mail type, select Marketing.
- In Website URL, enter the site where readers subscribe, so AWS can see what you send.
- In the use case description, describe how you send, such as confirmed opt in sign ups, one click unsubscribes and automatic bounce handling.
- Tick I agree to the AWS Service Terms and Acceptable Use Policy. You're confirming you only send to people who opted in.
- Click Submit request.
9Troubleshooting
| What you see | Cause and fix |
|---|---|
| Keys rejected when you click Save | Copy both AccessKeyId and SecretAccessKey again, with no spaces at either end. Check the region matches the one where you made the stack. |
| Stack status says CREATE_FAILED or ROLLBACK_COMPLETE | Your AWS sign in isn't allowed to make users. Log in with an administrator account, delete the failed stack in CloudFormation and click Create the user and keys in AWS again. |
| AWS says a stack called newsletter-sender already exists | You made it before. Open it in CloudFormation and copy the keys from its Outputs tab, or delete the old stack and run the wizard again. |
| An AccessDenied or not authorized message | If you made the user by hand, a policy is missing. Open IAM → Users → newsletter-sender → Permissions, click Add permissions and attach both AmazonSESFullAccess and AmazonSNSFullAccess. |
| Domain still not verified after an hour | Check all three DKIM CNAME records in Cloudflare are set to DNS only (grey cloud), and look for typos such as a doubled domain (abc._domainkey.yourdomain.com.yourdomain.com). |
| Status says Isn't in Amazon SES yet | Click Set up Amazon SES for me again. It's safe to repeat: anything already set up is kept and anything missing is added. |
| Can't send: still in the SES sandbox | Newsletter Sender won't send a campaign from a sandbox account. Wait for AWS to approve you by email, or ask yourself (see Requesting production access yourself). |
| Cloudflare didn't accept the token | Make a fresh one with Make a Cloudflare token, copy the whole token with no spaces and save it again. |
| That token can't see your domain | The token doesn't cover your domain. Make a new one and select your sending domain under Zone Resources. |
| Backups says your Amazon setup needs one more step | Your stack was made before backups were copied to S3. In CloudFormation, choose newsletter-sender → Update stack → Make a direct update → Replace existing template, paste the address shown in Newsletter Sender and click Next to the end. Tick the IAM box, click Submit, then click Copy to Amazon S3 now. |
| AWS turned down production access | Reply to AWS's email. Explain that your list uses double opt in, bounces are suppressed automatically and every email has a one click unsubscribe link. Requests are often approved on a second review. |
Need help? Get in touch with the status messages or errors you see. For your security, never share your secret access key or Cloudflare tokens.